Because the best things in life are free
|
|
|
First of all, I have to admit that this page is maybe more for me than anyone else; plenty of things I will put here are focused on how I set up my box/hardware; so that next time (if any), I will not have to figure out what I did to get things going the last time. And if you wonder why I'm thinking of installing again: simple, if Mandrake/linux is to get better, what else to do then to test the betas and release candidates and report bugs? Recently I found out that someone else had the same idea, you may find some more info here.
Note:
Resources configuration steps Read the Resources Configuration and Software Install HowTo by Zeb first, and follow up the info given there. In case you cannot get to the mentioned clubmember info to configure your resources, you may have to go to the easy urpmi page, that is slightly more difficult since for Mandrake 9.2 the page has not been updated. So in that case, get the links for Mandrake 9.1 and check with your webbrowser if/where on the same ftp-server the 9.2 files reside. Note that it is possible that the (relative) location of the hdlist file is not the same as for Mandrake 9.1.
To avoid getting some warning of a missing signature for the PLF packages, I did:
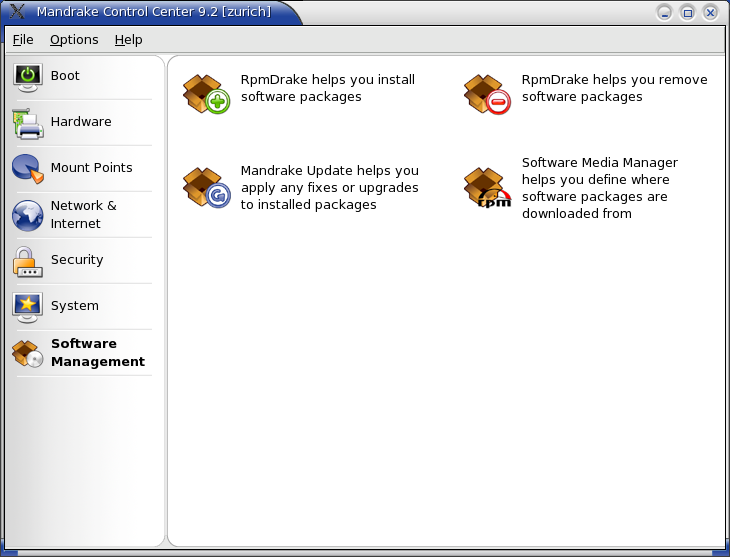
After configuring the repositories, it is really easy to install software, with RPMDrake (Mandrake Control Centre - Software Management) or urpmi. Hint: if you have the iso images of Mandrake 9.2 on your harddisk and you want to set your system up so that it installs any new packages from those images (so you don't have to deal with inserting cd's anymore -- nor with trying to find them), you can do what I did (maybe there are easier ways, but this works for me; naturally, if you install your system with a bootfloppy and the iso's on your harddisk, I suppose you don't need to do this). As root, do the following (all you have to change is the path to your iso images, for the rest it's cut and paste without touching the keyboard):
To make sure the iso images get mounted each time you boot, you could add the mount commands to If you have the cd's and nothing on your harddrive, just copy the RPMS directories to a directory named Mandrake, and don't forget to copy the base dir on the first cd too. Then adjust the paths as shown below.
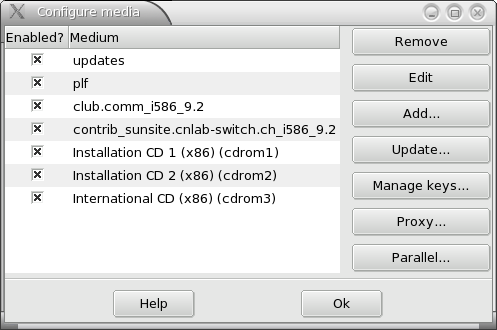
and start the Software Media Manager
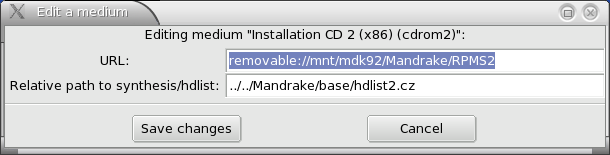
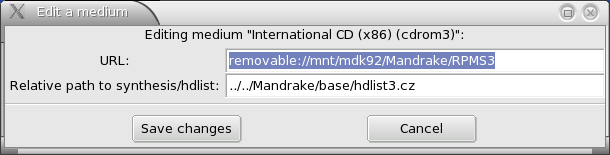
Select and edit each of the three cd entries so they look like this: Each time you click 'ok' to confirm, the system will check if the paths are correct, and it will update the database.
/etc/urpmi/urpmi.cfg. In that case however, the system won't check right after you make the modifications so you have to check if the changes were correct.
Nvidia 3d driver You can follow my instructions here. Webcam driver
With the download edition kernel, there is a problem with the usb-snd-audio driver; since my webcam is a usb cam and since it has a microphone, the system runs into this problem -- it wouldn't boot, mentioning a disability
To be able to have VGA resolution on my webcam, which needs a proprietary driver (see here: http://www.smcc.demon.nl/webcam/ for more info). To load the extra driver each time the webcam driver gets loaded, I did: Just copy that 'echo' line as one single line into your Konsole. No typing required. ;-)
System monitoring
To be able to keep an eye on the state of my system, I use gkrellm; to have cpu-temperature and motherboard voltage readouts, lm-sensors is needed. To install those, do: K3B configuration
To burn cd's I use the program K3B. Before it can be used as a normal user, some rights have to be adapted and some things have to be configured, so I started the K3B configuration tool, as root: DVD playback with mplayer and xine
Now the stuff that is necessary to watch dvds (that Mandrake, or any other linux vendor for that matter, is not able to include, since it would violate some stupid US law) has to be installed: Home LAN computer names
I did the following to set the hostnames so that with CUPS I could print over the network (if not set, there will be a problem between the ethernet address and the name that is given during installation; other hosts will not know the host with the printer by name, just address, but the name plus printer will show up in the cups www control panel), modify /etc/hosts to include the ethernet address and the name by which the host is known to itself. This way, the client can find the host that has the printer connected to it since it can do address translation from the host name to the right ethernet address. Setting up the IR Remote Control
To get the remote control that came with my tv-card working, I needed LIRC, so I issued the following commands, as root: Some small explanation: yes I am not a guru, I know this isn't pretty but at least it makes it work. It should normally not be necessary to add the extra stuff to the /etc/rc.local file. But anyway. Then I created (with quite a lot of trial and error) the file in my homedir ~/.lircrc that makes lirc and mplayer work together. Make sure you do switch on lirc support of mplayer. And voila. So now I can move the mouse with the remote, fully control mplayer from the sofa. KDE / graphical user interface configuration steps Most of the following things are done by the user, in the users home directory (/home/[user]) or with gui tools.
First things first, which for me means to get usable (windows) behaviour. Meaning: not the standard behaviour that the most used OSes have, but something that you (I really) can actually work with. I want/need/require (hey it´s my machine, I can require things of it, right?) the following:
It must be my lucky day, because all this can easily be done with KDE. Actually, points 3 to 8 are readily available already, without having to change anything in the settings. Note that point 7 is necessary since I wanted that clicking in a window does not bring it to front (which is the case in the standard less usable behaviour). 3 and 4 is done with alt+lmb, 5 and 6 with alt+rmb, 7 and 8 with alt+mmb. To get 1 and 2, start KDE control center: Menu => what to do => administer your system => configure KDE. (Alternatively there are entries for all subsections of the KDE control centre in Menu => Configuration => KDE, but we'll be doing more than just this.)I have gotten a bit creative and made a shockwave flash page (warning: ~600KB) on what this behaviour looks like. Now expand the LookNFeel section by clicking on the plus sign in front of it. Go to Window Behavior, and choose the Policy: Focus Follows Mouse; then unselect ´auto raise´ and ´click raise´. At the top, go to the second tab ´Actions´ and in the ´Inactive Inner Window´ make sure all three entries say: ¨Activate & Pass Click¨. The lower part should have alt as the modifier key, and lmb+mod key=move, mmb+mod key= toggle raise & lower, rmb+mod key = resize. Don't forget to click apply at the bottom.Now that we´re here, we may as well set the single click part, so that a single click on a desktop icon will do to launch whatever is being clicked. Expand (on the left side) the Peripherals section, select the ´mouse´ entry, and select ´Single-click to open files and folders´ in the Icons-section. BTW in the ´Advanced´-tab you can adjust the speed of the mouse (among other things) if it´s not to your liking.
Now that the KDE CC is open anyway, let´s expand the ´LookNFeel´ section again, and select ¨Behaviour¨. If you don´t want to have icons on your desk with Something else that I like is Icon Zooming, in case you don't know you can check out what that looks like (~320KB). Right click the panel and select 'Panel Menu' => 'Configure Panel', in the new window that opens select the 'Appearance' entry on the left side, and tick the box: "Enable icon zooming". Setting up the extra mousbuttons on my Logitech MX700
To be able to use the extra mouse buttons that I have on my MX700 wireless optical USB mouse I did the following:
plus, of course the following (also as normal user, in the home-dir) to make the right .imwheelrc:
With these settings/files the thumb buttons on the mouse are "back" and "forward" in browsers/konqueror, and the wheelbuttons function as if the wheel is continuously being scrolled respectively up or down. My
Configuring the analogue rear channels of my SBLive5.1 audio card
To get audio out of the rear speakers with my SBLive5.1 and ALSA in my analogue 4 channel setup, I opened kmix (start - multimedia - sound - kmix) and muted the last culumn:
Oh and by the way, after install, the main volume control is muted. So you're going to have to play a bit with the sliders in kmix. (Even if the sliders indicate a non-zero volume setting, you have to slide a bit for the setting to be accepted.)
Setting up java in Konqueror, Mozilla and Opera
To install java, just do:
Getting back the 'good' fonts in Opera
After upgrading Opera to something newer than 7.22 or so, your fonts may suddenly get ugly (they did in my case),
just edit your
Total configuration time
Estimated total configuration time: less than one hour. Total downloads: ~100MB give or take a few. With the installation time of about an hour (including thinking about what packages to install etc), two hours plus 100MB downloads to get a completely functional and usable system sounds pretty good to me.
|