
Configuration of Mandrakelinux 10.1
Related links
Easyurpmi: guide,
setup
easy urpmi setup
urpmi HowTo
DKMS: dealing with proprietary drivers
For VGA resolution with pwc webcams: pwc(x) via dkms.
Site news
Latest site additions:
Updated January 13rd 2008:
My LIRC page: The Linux Audio Server Project - Revisited
Added January 3rd 2008:
My (K/X/)Ubuntu review: Ubuntu - beyond the hype
Added December 2nd 2007:
My Mandriva 2008.0 review
Added November 20th 2007:
The configuration page of Mandriva Linux 2008.0
Added November 18th 2007:
The Installation walkthrough of Mandriva Linux 2008.0
Added November 17th 2007:
The review of openSUSE 10.3
Added July 8th 2007:
The Configuration page of Mandriva Linux 2007.1 Spring
Added July 1st 2007:
The Installation walkthrough of Mandriva Linux 2007.1 Spring
Added December 18th 2005:
The third and final part of my Mandriva Linux 2006 review
Added November 14th 2005:
The second part of my Mandriva Linux 2006 review
Added November 6th 2005:
The first part of my Mandriva Linux 2006 review
For older additions please see the articles page.
This page describes how I configure Mandrakelinux on my systems.
Plenty of things I put here are focused on how I set up my hardware; so that next time (if any), I will not have to figure out what I did to get things going the last time. And if you wonder why I'm thinking of installing again: simple, if Mandrake/linux is to get better, what else to do then to test the betas and release candidates and report bugs?
Note: if you want you can still read my config page of Mandrakelinux 10.0 Community Edition, and even the preceding config page of Mandrakelinux 9.2.
By the way, some of these instructions are very much related to the hardware that I'm installing this on, so I have added the spec of my system (both hardware configuration and software config files).
To cover more hardware I installed on my own desktop (zurich) and my laptop. I will install 10.1CE on my wife's desktop too (neuchatel). Edit: I used the powerpack on my wife's desktop, and there was nothing left to configure.
Note:
commands to type have this colour and font
keystrokes/presses have this colour and font
cli = command line interface

lmb = left mouse button, mmb = middle mouse button, rmb = right mouse button
Most of the commands in this and subsequent sections are executed as root, use the command su (and give your root-password when prompted) to become 'root' and then execute those commands.
Updates to this page
Update! January 27th: Added info on new ways of dealing with nvidia, pwc(x) and other proprietary drivers - see the links on the right hand side on dkms, and from my brother some info on wireless networking setup (2 different laptops, Mdk 10.0 and 10.1 - being thorough is in the family I guess..). I also added some info in the K3B section on burning cds. On a side note, it seems that in newer versions (2.6.10 and up, now in cooker) of the Mandrakelinux kernel, the LIRC modules are back again. So one less thing to configure in future versions.
Update! November 10th: Corrected some information about X.Org 6.8, and added info for use with the new NVidia drivers (6629) that just came out.
Update! November 5th: I tried out X.org 6.8 which is included on the Mandrakelinux 10.1 OE dvd. I have included the info to be able to duplicate my steps, see below.
Update! October 30th: I installed 10.1 Official Edition (OE) and I am adapting this page to reflect the improved configuration - compared to 10.1 Community Edition (CE), they fixed at least the webcam-pci-soundcard conflict and the K3B dvd burn speed setting (and some minor things that I never even mentioned but had seen). As with 10.1 CE I have built the modules for pwc and lirc, see below.
October 20th 2004: Update! I added info on how to get pwc based webcams to work at VGA (640x480) resolution. These are the webcams that previously needed the pwcx driver, lots of Philips but also Logitech and Askey webcams are concerned. Read on below.
September 28th 2004: Update! I managed to get LIRC going. The modules just went missing, so I compiled them for your use. Read on below.
Resources configuration steps
To get a hold of the true power of urpmi, the Swiss knife of rpm-installing, you must first set up your sources/repositories. I'm assuming a functional internet connection at this point.
So head on over to the easy urpmi page and follow the 3-step instructions. Most important are plf and necessary for that the contrib media repositories, as playback of encrypted dvds will not be possible without plf. Quite a few things are not on the 4 cds, so it pays off to add main too. (You will need main for instance for imwheel, dvdrip, kbabel, gkrellm-server, lirc, lirc-remotes; unless if you have all 5 cds...)
For more information on setting up urpmi, read the Resources Configuration and Software Install HowTo by Zeb.
After configuring the repositories, it is really easy to install software, with RPMDrake (Mandrake Control Centre - Software Management) or urpmi.
urpmi [packagename(s)]
Installs the package / program; it automatically gets all dependencies. Note also that you can put more than one programname/packagename in one command.
urpmi --noclean [packagename(s)]
is actually what I use most of the time, since then the downloaded files are in /var/cache/urpmi/rpms/
where I can easily retrieve them to use again on another computer for instance. Next to --noclean, other interesting options are --fuzzy and --test.
Hint: if you have the iso images of Mandrake 10.1 on your harddisk (practical to be able to burn them) and you want to set your system up so that it installs any new packages from those images (so you don't have to deal with inserting cd's anymore -- nor with trying to find them), you can do what I did (maybe there are easier ways, but this works for me; naturally, if you install your system with a bootfloppy or boot-cdrom and the iso's on your harddisk, I suppose you don't need to do this). I will assume that you have copied the iso images to /home/mdk101ce/. As root, do the following (all you have to change is the path to your iso images, for the rest it's cut and paste without touching the keyboard):
mkdir /mnt/mdk101ce_cd1

mkdir /mnt/mdk101ce_cd2

mkdir /mnt/mdk101ce_cd3

mount -t iso9660 -o loop /home/mdk101ce/Mandrakelinux-10.1-Community-CD1.i586.iso /mnt/mdk101ce_cd1

mount -t iso9660 -o loop /home/mdk101ce/Mandrakelinux-10.1-Community-CD2.i586.iso /mnt/mdk101ce_cd2

mount -t iso9660 -o loop /home/mdk101ce/Mandrakelinux-10.1-Community-CD3.i586.iso /mnt/mdk101ce_cd3
To make sure the iso images get mounted each time you boot, you could add the exact mount commands as above to /etc/rc.local or you can mess with /etc/fstab.
After this I set things up in the Mandrake Control Center, Software Management section, Software Media Manager; I just selected the cdroms 1 to 3 in turn and had the path point to the links I had just created. (See screenshots below.)
If you have the cd's and nothing on your harddrive, just copy the media directory contents of each cd to your harddrive. Then adjust the paths as shown below.
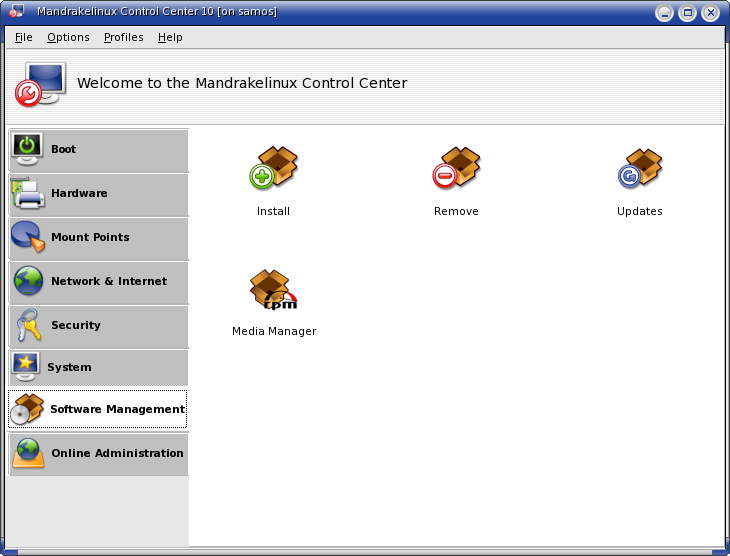
and start the Software Media Manager

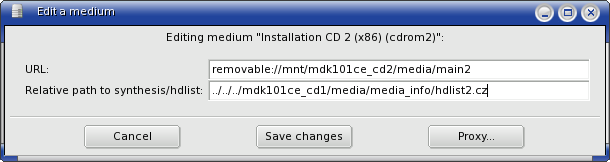
Select and edit each of the three cd entries (in my case I have four since I used the clubmember download edition) so they look like this:
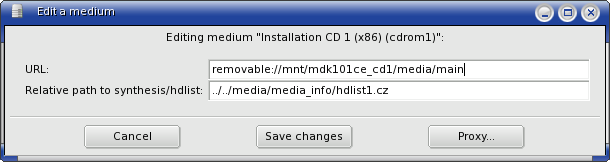
Each time you click 'ok' to confirm, the system will ask for the cd - just click OK, this whole trick is about outsmarting the system... ;-)
Don't worry, it will work fine, next the system will check if the paths are correct, and it will update the database. That takes a few moments. Continue with the 2nd and 3rd cd. (And 4th and 5th if you have those.) Pay attention to the exact paths, for the 1st cd there are less ../ in the path for the synthesis/hdlist, because we're actually pointing to the sythesis/hdlists that are on the 1st cd.

man urpmi.addmedia for more info.
One more thing that I started doing during ML10.1CE beta testing: I moved the dir /var/cache/urpmi/rpms to /home/[version-indication] and made a link to the latter from the location of the former, so that all rpm's downloaded with urpmi --noclean [packagename] would not be lost if I installed the system again on the same / (root) partition. And even if I'd install on another root partition, I wouldn't have to search for those rpms.
Nvidia 3d driver
You can follow my instructions here. Note that you have to have the correct kernel sources installed - they are on the 2nd installation disc. Use the command
urpmi kernel-source
to install the correct package. Alternatively, you can opt to merely install the stripped version, as indicated in my installation walkthrough, which saves around 120MB of disk space. To do that, issue the command:
urpmi kernel-source-stripped
I had to put nvidia in the file /etc/modprobe.preload to get X to start at boot, after installing the nvidia driver.
One more comment: the most recent nvidia driver package is NVIDIA-Linux-x86-1.0-6111-pkg1.run.
Update: you may want to use dkms for this driver.
Webcam and pci soundcard issue
Update: the info below is left here for historical reasons; the webcam-pci soundcard issue was solved, and the highres webcam images can be had by following the instructions here: http://forum.mandrakeclub.com/viewtopic.php?p=119002#119002. There's more info about dkms here: http://forum.mandrakeclub.com/viewtopic.php?t=32376
With the download edition kernel, there is a problem with the usb-snd-audio driver; since my webcam is a usb cam and since it has a microphone, the system runs into this problem: the audio mixers show only one microphone and nothing else, and the audio output is not working.
This issue was present in Mandrakelinux 10.0 aswell,
I found out that things work properly if the following lines are added to /etc/modprobe.conf
#fix for usb audio conflict with pci audio

options snd cards_limit=2

alias sound-card-0 snd-emu10k1

alias sound-card-1 snd-usb-audio

options snd-emu10k1 index=0

options snd-usb-audio index=1

alias sound-slot-0 snd-emu10k1

alias sound-slot-1 snd-usb-audio
and the following added to /etc/modprobe.preload
snd-emu10k1
As said, this is an old issue, here's my bugreport: http://qa.mandrakesoft.com/show_bug.cgi?id=8004
Thanks to Dave Girard (who's additional solution you will find on this link, I modified my solution) for the addition of the modprobe snd-usb-audio command to still have the use of the microphone of the webcam. Note that in this order (before the 'modprobe audio' command) it does actually show up in kmix - there will be a selection label to choose between the normal audio card and the usb device. (Dave, hope you got that last bit too, just a tad more polish.. ;-)
Note: it seems this will be fixed in Mandrakelinux 10.1 Official Edition. Edit: indeed it is!
The following section used to read:
To be able to have VGA resolution on my webcam, which needs a proprietary driver, there is some more magic needed that I have not had the time to figure out. The old way as described on my configuration page for Mandrakelinux 10.0 doesn't work (or I did something wrong). If you know how to do it, feel free to contribute.
But, luckily there is a fix for this issue. The proprietary driver (pwcx which enables VGA resolution mode) went missing due to it being proprietary and needing a hook in the open source (pwc - which only gives stamp size images) driver which has been included in the kernel since a long time. Kernel maintainers realised that the hook's primary intent was to load a proprietary module and this is not allowed - it had just escaped them until now. So they took out the hook, and this upset Nemosoft, the maintainer of pwc and pwcx. He 'resigned' from the maintenance of the module. Luckily, someone stepped up and offered to maintain the module pwc. So that's why that one is in the kernel once more (it did get stripped out for a bit).
Another person, Luc Saillard, managed to reverse engineer (part of) the pwcx driver, and combined that with the existing pwc driver. It is his work that I'm using now, and after following some simple steps which I'll describe below, my webcam now works just as before.
To compile the new pwc module, you need the kernel source of your kernel installed (uname -r to find out which kernel you're running, then urpmi kernel-source to install it - if necessary adapt that urpmi-command for your kernel) along with the development tools (gcc and make - don't know which packages). Then you can do the following (first as normal user, and from the su command as root):
mkdir pwcmodule

cd pwcmodule

wget http://www.saillard.org/pwc/pwc-10.0.4.tar.bz2

tar -jxvf pwc-10.0.4.tar.bz2

cd pwc-10.0.4

make

su

[give your password as requested]

mkdir oldpwc

find /lib/modules/`uname -r`/ -name "pwc*.ko*" | mv ./oldpwc

cp pwc.ko {path to the folder of original pwc.ko module}

depmod -a

rmmod pwcx

rmmod pwc

modprobe pwc
Note that for a standard Mandrakelinux 10.1 CE installation the path to the module should be: /lib/modules/2.6.8.1-10mdk/kernel/drivers/usb/media/ edit: this is /lib/modules/2.6.8.1-12mdk/kernel/drivers/usb/media/ for Mandrakelinux 10.1 Official Edition, and the original module in there is called pwc.ko.gz. If you trust me to not have tampered with the module, and also my webspace provider, in that they have not been hacked or messed with things themselves, you can use the binary that I compiled in the exact same manner as described above - this may help those who don't have the kernel source installed, or the development tools.
mkdir pwcmodule

cd pwcmodule

wget http://www.mandrake.tips.4.free.fr/lib/modules\

/2.6.8.1-10mdk/kernel/drivers/usb/media/pwc.ko

su

[give your password as requested]

mkdir oldpwc

find /lib/modules/`uname -r`/ -name "pwc*.ko*" | mv ./oldpwc

cp pwc.ko /lib/modules/2.6.8.1-10mdk/kernel/drivers/usb/media/

depmod -a

rmmod pwcx

rmmod pwc

modprobe pwc
Note that the above is only going to work fine if you use the exact same kernel; if not, you'll have to force the driver to load, and really, it's not hard to compile the module by yourself.
This should work with the Philips: 675, 680, 690, 720, 730, 740 and 750 cams, but not the 645 or the 646 - I don't know which cams of other brands like Logitech or Askey will also work (mail me if you know), but I found this short list mentioned in the source code.
So now we can only hope that this driver will at some point be included in the standard kernel, or at least the Mandrakelinux kernel - so that we won't have to mess anymore with this, and can enjoy VGA resolution with our webcams out of the box.
Lastly: a great big thank-you to Luc Saillard!
Update: I have recompiled the pwc module for 10.1OE, get it like this:
wget http://www.mandrake.tips.4.free.fr/lib/modules\

/2.6.8.1-12mdk/kernel/drivers/usb/media/pwc.ko
All other lines above remain the same.
System monitoring
To be able to keep an eye on the state of my system, I use gkrellm; to have cpu-temperature and motherboard voltage readouts, lm-sensors is needed. To install those, do:
urpmi lm_sensors gkrellm
followed by:
modprobe i2c-dev
(if you forget that one, you'll get strange errors and no sensor output. Edit: this is no longer necessary in 10.1OE.)
Next to setup the sensor system:
sensors-detect
and just followed instructions (just accepted all default proposals). This creates the file /etc/sysconfig/lm_sensors which indicates which modules must be loaded for lm_sensors to function properly. sensors gives the output from the sensors on the motherboard if the necessary modules are loaded. Of course the program gkrellm is much nicer for continuous display of your system stats (note that on the mobo and cpu temp in gkrellm I have to use a factor of 0.1 to get the right value; this apparently happens with certain sensors/chipsets/mobos). I noticed that the fanspeed of the CPU fan and the casefan are actually detected, but it seems at the low revs they make, the BIOS actually sets the value to 0 most of the time...
K3B - cd and dvd burning
Contrary to older Mandrake versions (before Mandrakelinux 10.0), no setup is necessary. Kernel 2.6 can burn directly to ide devices without using ide-scsi emulation, and Mandrake has packaged K3B in a way so that it can also burn dvd's.
One thing I have to mention about dvd burning with K3B: the speeds that you can select for dvd burning depend on the maximum cd-r burn speed. Normally with my burner the drop down list shows this: auto, ignore, 1x, 2x, 4x, 6x. No mention of 8x even with an 8x dvd+r disc.
Edit: this issue has been fixed in Mandrakelinux 10.1OE!
So I have filed a bugreport on KDE's bugzilla and this issue has been fixed, but not in the K3B program that comes with Mandrakelinux 10.1 CE. My workaround is very simple, the dvd burn speeds that K3B offers are equal to the cd-r maximum speed divided by 8. So to get 8 speed burning on my NEC ND3500 as an option, I set the maximum cd-r write speed to 64. For the 12x option to appear, you have to select 96x cd-r. The cd-r speed is a 2 digit number, which means 99x is the maximum, so burning at higher than 12x speed is not possible. Note that even though my burner supports 16x, I don't really care about that, for 2 good reasons:
1- I have no 16x dvd+r discs, and
2- burning at 16x does not get the disc written in less time than at 12x, according to many reports on the web. (The explanation is that the burning is done with Zone Constant Linear Velocity (ZCLV), meaning that for some time the burn will be done for instance at 4x, then the speed moves up to 6x, then to 8x and then to 12x and even to 16x if burning at 16x. But for a 16x burn more time seems to be lost on lower burning speeds, so that with 12x the average speed is still around the same time as for a 16x burn.)
Now a few words on my dvd burner: NEC ND 3500. I bought this drive because it has a firmware upgrade tool for Linux. So no booting with bootfloppies, or even worse: having to put your drive into a windows machine in case the vendor only provides windows executables to upgrade the firmware. Thanks go to Herrie for the NEC firmwares and Liggy for the firmware update tools. (Note: you have to be root for the necflash program to work.)
Anyway, I can recommend this drive, it is fast and burns well.
Addition: Gary Franken took the time to mention that burning with the setting on 'auto' sometimes gives problems, K3B may want to burn in 'tao' mode where it should have chosen 'dao' mode. I don't know in how far this is burner dependent (failure in 'tao' mode), I have not experienced this issue myself, although I have noted that for burning iso images, K3B indeed chooses 'tao'... I guess the point is that in case of problems, this is a setting to fiddle with. BTW Gary has a Liteon burner.
DVD playback with mplayer and xine (and frontends to those)
Now the stuff that is necessary to watch dvds (that Mandrake, or any other linux vendor for that matter, is not able to include, since it would violate some stupid US law) has to be installed:
urpmi libdvdcss
will get the necessary decryption to have xine or mplayer playback dvds without any problems. (Btw, if you start mplayer from the cli but you want the gui version and/or rightclick menus, just type gmplayer instead of plain mplayer... Of course you need to have the gui version installed, urpmi mplayer-gui to get it.)
I have done some more digging, and on the Videolan site where libdvdcss is housed I found the info I have been looking for for quite a long time: on Linux with libdvdcss, the region code of your drive is not relevant, nor is the region code of the discs you play. The RPC2 counter just doesn't count, on drives that have no region set yet, this will stay that way - this I verified myself. You can check the drive's region on Linux with dvd_region.c which you can get from here.
Home LAN computer names
I did the following to set the hostnames so that with CUPS I could print over the network (if not set, there will be a problem between the ethernet address and the name that is given during installation; other hosts will not know the host with the printer by name, just address, but the name plus printer will show up in the cups www control panel), modify /etc/hosts to include the ethernet address and the name by which the host is known to itself.
echo "192.168.0.1  paris" >> /etc/hosts

echo "192.168.0.2  neuchatel" >> /etc/hosts
This way, the client can find the host that has the printer connected to it since it can do address translation from the host name to the right ethernet address. Naturally, CUPS is just one example; this makes it possible for my machine to know all other machines by name, from web browsers to ssh and ftp on the command line.
Scanner on the server
I'd like to show how easy life can be, and since not many people know it can be done (they must have gotten too much used to non-network oriented operating systems), I'll now do a little click through wizardry with the wizard scannerdrake.
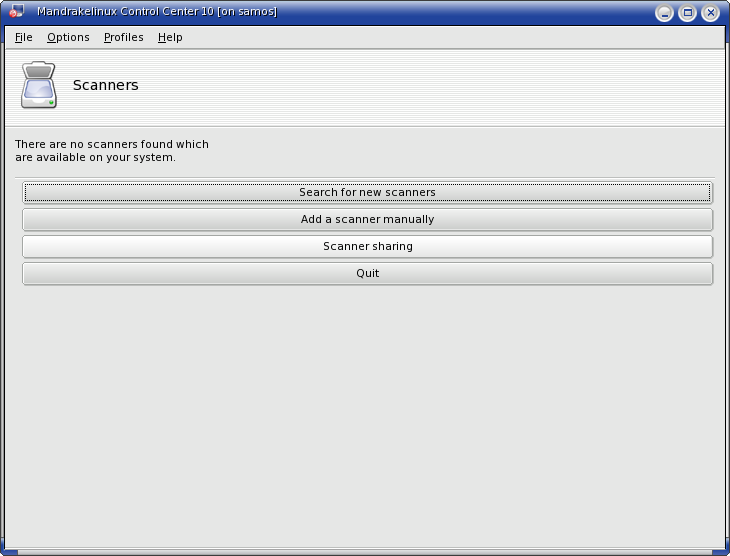
To be able to use the scanner that is connected to my server, I went into the Mandrakelinux Control Center and selected Hardware on the left, then selected the Scanners-icon. This launches scannerdrake.

It then gave me a message that SANE packages needed to be installed,
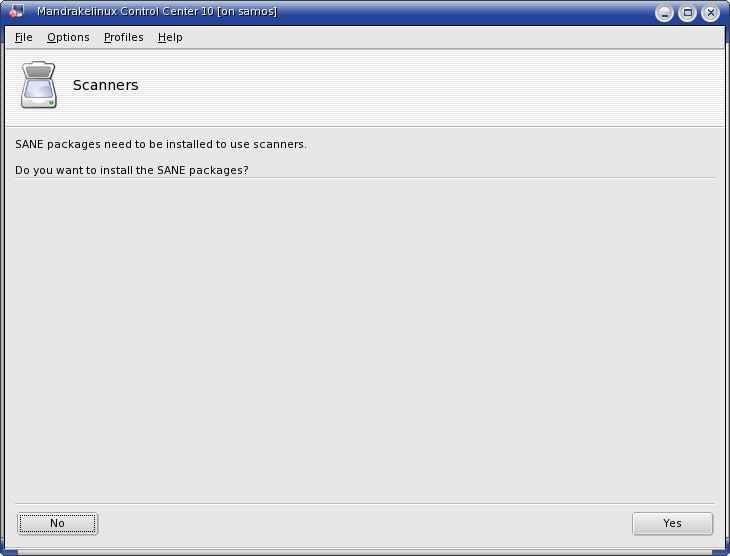
and I OK-ed the question if that was alright. Then I was presented with the (empty) list of available scanners and the selection buttons (bars?) to add scanners.
I chose the scanner sharing button, which let me indicate if I wanted to share local scanners and from which remote machine to use the scanner.
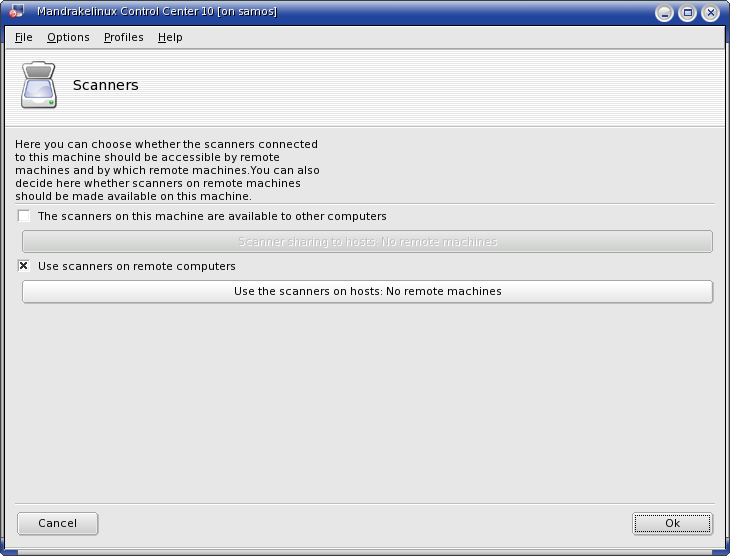
I went for the
use the scanners on host-button.
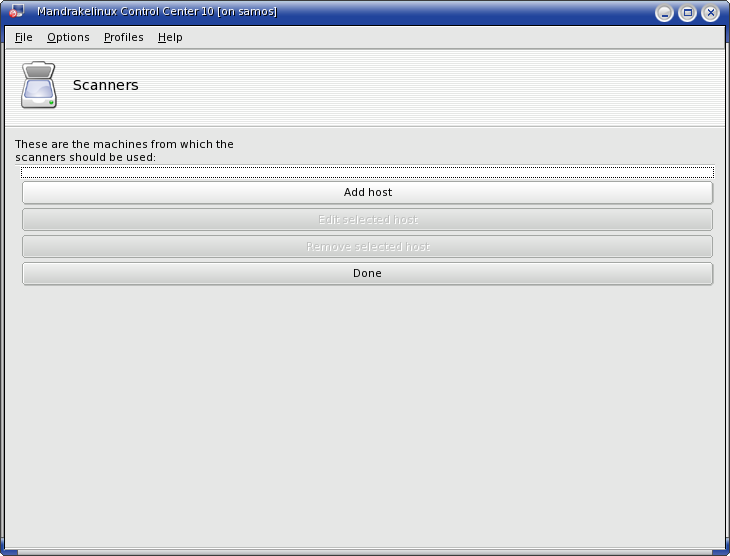
Then I opted to add a host, I just filled in the name of my server:

Which led me back to the available scanners list and options to add more scanners.

I wouldn't know how to set up scanner sharing on other systems, but I can say that this is really really easy on Mandrakelinux (it has been for quite a while now). Note that on the machine with the scanner you have to setup scanner sharing and share to the ip of the client machine, obviously...
Setting up the IR Remote Control
To get the remote control that came with my tv-card working, I needed LIRC, so I issued the following commands, as root:
urpmi lirc lirc-remotes

cp /usr/share/lirc-remotes/hauppauge/lircd.conf.hauppauge /etc/lircd.conf

cp /usr/share/lirc-remotes/hauppauge/lircmd.conf.hauppauge /etc/lircmd.conf

vi /etc/sysconfig/lircd
where I changed the following things:
DRIVER=UNCONFIGURED into: DRIVER=default
and:
HWMOD=UNCONFIGURED I replace with the following 2 things:
HWMOD=lirc_dev

HWMOD=lirc_i2c
Next, I ran into problems, that others had found before me, see also this bugreport. Short version: the modules necessary for LIRC are not included with the standard Mandrake kernel: 2.6.8.1-10mdk. Now, there are two solutions: either use the multimedia or tmb kernel (urpmi kernel-multimedia-2.6.7-1.mm.6mdk kernel-multimedia-source or urpmi kernel-tmb-2.6.7-2.tmb.6mdk kernel-tmb-source) or use the modules that I compiled for the standard kernel and that I have put here: /lib/modules/2.6.8.1-10mdk/kernel/3rdparty/lirc/. The modules for 10.1OE are here: /lib/modules/2.6.8.1-12mdk/kernel/3rdparty/lirc/ Just put them in that exact place on your system, for instance with these commands (as root, like most things here):
mkdir -p /lib/modules/2.6.8.1-10mdk/kernel/3rdparty/lirc
Then download the lirc drivers to that directory and do:
depmod -a
Note that I compiled all those drivers but I have only used/tested lirc_dev and lirc_i2c -- if you have success with other modules than those, please let me know. Since the device doesn't get properly created (the necessary info is not passed by the kernel to udev), do the following, still as root:
mkdir /dev/lirc

mknod /dev/lirc/0 c 61 0
Finally, to start things I issued these 2 commands:
service lircd start

service lircmd start
To have things started properly at boot, you can execute the following commands:
echo "mkdir /dev/lirc" >> /etc/rc.local

echo "mknod /dev/lirc/0 c 61 0" >> /etc/rc.local

echo "service lircd start" >> /etc/rc.local

echo "service lircmd start" >> /etc/rc.local
For the lircmd there are some extra things necessary in the /etc/X11/xorg.conf file, namely the extra mouse section and the related mouse setting in the server section at the end of the file.
These are the relevant lines:
#added aRTee:

Section "InputDevice"

    Identifier "LircMouse"

    Driver "mouse"

    Option "Device" "/dev/lircm"

    Option "Protocol" "IMPS/2"

    Option "Buttons" "5"

    Option "ZAxisMapping" "4 5"

EndSection
and at the end:
Section "ServerLayout"

    Identifier "layout1"

    InputDevice "Keyboard1" "CoreKeyboard"

    InputDevice "Mouse1" "CorePointer"

# added aRTee

    InputDevice "LircMouse" "SendCoreEvents"

    Screen "screen1"

EndSection
I just continued to use the file (that at the time I created with a lot of trial and error) in my homedir ~/.lircrc that makes lirc and mplayer work together. Make sure you do switch on lirc support of mplayer and xine. And voila. So now I can move the mouse with the remote, fully control mplayer from the sofa, go through menus in xine, like with a normal dvd player.
Update! I have been informed that the lirc_serial_home module also works, but there is a problem with the initscripts in lirc-0.6.6-7mdk... I haven't looked into this, if you need the patch let me know, I'll put it up.
KDE / graphical user interface configuration steps
Most of the following things are done by the user, in the users home directory (/home/[user]) or with gui tools. Note that I did most of this before, I just continued to use the same /home partition and home dir.
First things first, which for me means to get usable (windows) behaviour. Meaning: not the standard behaviour that the most used OSes have, but something that you (I really) can actually work with. I want/need/require (hey it's my machine, I can require things of it, right?) the following:
- window focus follows mouse (meaning, the window that the mouse pointer is on/in is the one that is active, so when I type it will go into that window)
- clicking in any window with the lmb, mmb or rmb does not bring the window to front (meaning, I can actually select something in a window with the lmb without the window popping to the front)
- move a window without having it on top
- move a window without having to go to the window frame with the mouse pointer
- resize a window without having it on top
- resize a window without having to go to the window frame with the mouse pointer
- bring a window to the front without having to go to the window frame with the mouse pointer
- send a window to the back without having to go to the window frame with the mouse pointer
- single click on icons to launch applications or descend into folders
It must be my lucky day, because all this can easily be done with KDE. Actually, points 3 to 8 are readily available already, without having to change anything in the settings. Note that point 7 is necessary since I wanted that clicking in a window does not bring it to front (which is the case in the standard less usable behaviour). 3 and 4 is done with
alt+lmb, 5 and 6 with alt+rmb, 7 and 8 with alt+mmb. To get 1 and 2, start KDE control center: Menu => what to do => administer your system => configure KDE. (Alternatively there are entries for all subsections of the KDE control centre in Menu => Configuration => KDE, but we'll be doing more than just this.)I have gotten a bit creative and made a shockwave flash page (warning: ~600KB) on what this behaviour looks like.
Now expand the LookNFeel section by clicking on the plus sign in front of it. Go to Window Behavior, and choose the Policy: Focus Follows Mouse; then unselect 'auto raise' and 'click raise'. At the top, go to the second tab 'Actions' and in the 'Inactive Inner Window' make sure all three entries say: 'Activate & Pass Click'.
The lower part should have
alt as the modifier key, and lmb+mod key=move, mmb+mod key= toggle raise & lower, rmb+mod key = resize. Don't forget to click apply at the bottom.Now that we're here, we may as well set the single click part, so that a single click on a desktop icon will do to launch whatever is being clicked. Expand (on the left side) the Peripherals section, select the 'mouse' entry, and select 'Single-click to open files and folders' in the Icons-section. BTW in the 'Advanced'-tab you can adjust the speed of the mouse (among other things) if it's not to your liking.
Now that the KDE CC is open anyway, let's expand the 'LookNFeel' section again, and select 'Behaviour'. If you don't want to have icons on your desk with /mnt/cdrom2 /mnt/cdrom /mnt/floppy written to them, you can deselect the 'Display devices on desktop' checkbox. Hint: if you then right click on your desktop and select Create New => Link to Location (URL) you can just add a name, like: my dvdrom and a location: /mnt/cdrom2 (which is where my dvdrom gets mounted; check that in /etc/fstab).
Something else that I like is Icon Zooming, in case you don't know you can check out what that looks like (~320KB). Right click the panel and select 'Panel Menu' => 'Configure Panel', in the new window that opens select the 'Appearance' entry on the left side, and tick the box: "Enable icon zooming". This dialog is also in the 'look and feel - panel' section of the KDE Control Center.
Setting up the extra mousbuttons on my Logitech MX700
To be able to use the extra mouse buttons that I have on my MX700 wireless optical USB mouse I did the following:
urpmi imwheel
as root, and as regular user:
echo "#!/bin/sh" > ~/.kde/Autostart/mx700backforth

echo "killall /usr/bin/imwheel" >> ~/.kde/Autostart/mx700backforth

echo "imwheel -k -b "67"" >> ~/.kde/Autostart/mx700backforth

chmod +x ~/.kde/Autostart/mx700backforth
plus, of course the following (also as normal user, in the home-dir) to make the right .imwheelrc:
With these settings/files the thumb buttons on the mouse are "back" and "forward" in browsers/konqueror, and the wheelbuttons function as if the wheel is continuously being scrolled respectively up or down. My
Note also that the 2.6 kernel works in a way that usb and ps/2 mice both work, no extra section is required anymore, except for the LIRC mouse daemon
Setting up java in Konqueror, Mozilla and Opera
If you're a clubmember and you set up the
It's not so much more work to get Java directly from SUN, go to their download page: http://java.sun.com/j2se/1.4.2/download.html and select
I found this info: http://www.neowin.net/forum/index.php?showtopic=204593, and combined it with http://gentoo-wiki.com/TIP_Xorg_X11_and_Tranparency - thanks to the authors for their work.
Paraphrasing and cut'npasting from: http://gentoo-wiki.com/TIP_Xorg_X11_and_Tranparency:
If you hadn't done so yet, log off and restart your X-server, then log in again.
To explain: I used
My brother kindly kept track of what he had to do to get both his laptops (IBM something and Dell D400) working with his wireless router. I'm copy-pasting directly what he wrote. Below that follows how I set up a borrowed prism based usb 802.11b dongle.
"In Mdk 10.0:
go to directory that contains the windows drivers (get the latest drivers for your card). In my case a Linksys WPC54g, I downloaded the latest version, unzipped it and in the directory are the .inf and .sys files.
shows if the driver is installed (in /etc/ndiswrapper/....)
stick in the card now if you have a pcmcia device. Then do:
This loads the module and creates a device 'wlan0' in my case.
Then start
It indicates choices of eth0 (built in ethernet) and eth0 (wlan card). Select the latter and indicate DHCP ip address retrieval or set the static ip address. (if needed select start at boot).
I like the control of starting and stopping interfaces manually:
In Mdk 10.1 on the Dell the procedure was almost the same. I have a combined card a/b/g in there and I had to install 2 drivers.
I obtained the latest driver from dell. (A self-extracting .exe - you can unzip it on Linux with 'unzip'.)
Go to mcc - networks - wireless - manual (here it shows wlan0 correctly)
I set the ip address to dhcp and startup on boot. It just went and I never looked back.
Thanks Mandrake and the ndiswrapper developers for all the good work!"
Now for how I set up a borrowed prism based usb 802.11b dongle. It is a Prism (Intersil) based Fujitsu Siemens branded usb 1.1 dongle. I think I made a mistake in not booting with the dongle connected, I connected it when the system was up... There are some packages that have to be installed manually, maybe booting with the device would have made that unnecessary (or maybe not), but anyway:
This created the configuration files in the directory /etc/wlan (which I didn't have before). It also installed some other things, control scripts for the wlan service for instance (wlan-ng). Doing
The ESSID in the above lines (myessid in this case) must be used at the end of the name of the wlancfg file; there is a default file which you can use, so just copy that one over to create a file with the correct name:
NOTE: it gets mentioned very often that one can do:
As for the WEP setup, this needs some more editing of /etc/wlan/wlancfg-myessid so that the relevant lines look like this:
I entered a 13 character key into the wireless access point web configuration page, which it transscribed to a 26 hex digit key. That configuration page also has an indication for which key is active - this must correspond to the number of the key that is active in /etc/wlan/wlancfg-myessid (dot11WEPDefaultKeyID). Well, in my case the access point counts from 1 to 4, and the wlancfg file has indications to count from 0 to 3. So key 1 on the access point (AP) corresponds to key 0 in wlancfg.
For the dot11WEPDefaultKey0 (1,2,3) you really have to put the value in hex digits, unlike what is used sometimes with iwconfig (iwconfig key s:somekeystring). You only have to put one key, namely the one you have activated on the AP and indicated in wlancfg-myessid as mentioned above. After these changes, you have to unplug the device, restart the wlan service (service wlan restart) and naturally have the AP correctly configured.
Related links: http://www.fuw.edu.pl/~pliszka/hints/prism2.html mostly for the usb setup and http://joshua.raleigh.nc.us/cpq_wireless_wep.html mostly for the WEP setup.
The missing LIRC modules cost me the most trouble, I hope Mandrake will fix this before Mandrakelinux 10.1 Official Edition (ML10.1OE). Since I ran into the webcam versus pci soundcard issue before it was easy to get it fixed, it's a shame that this issue still has to be fixed by hand. Additional note: yes they have, it seems this will be fixed.
I hope that people will really send in bug reports of all things, major and minor, that they come across, so that ML10.1OE will really be a very polished distribution.
If you have any comments you can discuss this information here: http://mandrakeusers.org/index.php?showtopic=19157
or you can contact me via email.
echo '".*"' > ~/.imwheelrc

echo "None, Down, Alt_L|Left" >> ~/.imwheelrc

echo "None, Up, Alt_L|Right" >> ~/.imwheelrc/etc/X11/xorg.conf mouse section contains the following (only the relevant section is shown here; you can also have a look at my whole /etc/X11/xorg.conf):
Section "InputDevice"

    Identifier "Mouse1"

    Driver "mouse"

    Option "Protocol" "ExplorerPS/2"

    Option "Device" "/dev/mouse"

    Option "ZAxisMapping" "6 7"

EndSection
lircmd.
Setting up java in Konqueror, Mozilla and Opera
commercial repository (more info via the MandrakeClub website), you have the easiest path to install java. All you have to do is this:
urpmi j2re
then set up your browsers to use java:
Konqueror: Settings > configure Konqueror > Java & Javascript: enable Java globally.
Mozilla: Edit > Preferences > Advanced, enable Java
Download J2SE JRE. Then follow the instructions at http://java.sun.com/j2se/1.4.2/jre/install-linux.html:
chmod a+x j2re-1_4_2_05-linux-i586-rpm.bin

./j2re-1_4_2_05-linux-i586-rpm.bin

[agree to the license agreement]

urpmi j2re-1_4_2_05-linux-i586.rpm

ln -s /usr/java/j2re1.4.2_05/bin/java /usr/bin/java
(note: there was already a link in: /usr/lib/mozilla/plugins/libjavaplugin_oji.so pointing at /usr/java/j2re1.4.2_05/plugin/i386/ns610-gcc32/libjavaplugin_oji.so, but the last ln command was necessary to get java into the standard executable path.)
How to use X.org 6.8 instead of the default 6.7
I used the Mandrakelinux 10.1 OE dvd, which houses a directory xorg-6.8/ in the root directory, all setup to be added as a medium repository. So here we go:
1- insert the dvd into your drive, or mount the iso image.
2- add the media repository, either with the GUI via MCC -> Software Management -> Media Manager like with the mounted iso images as shown at the top of this page, or with the following command (as root) :
urpmi.addmedia xorg6.8 removable://mnt/cdrom/xorg-6.8 with ./hdlist.cz
Make sure the path //mnt/cdrom/xorg-6.8 is correct.
3- do (as root) :
urpmi xorg-x11-6.8.1
You can now run Xorg 6.8 (just log off, and at the login screen hit ctrl-alt-backspace or select 'restart X-server'). But, you won't see any cool effects. We're going to need xcompmgr and transset and some modification to the /etc/X11/xorg.conf file for any cool stuff.
4- as user, do this:
mkdir xapps

cd xapps

cvs -d :pserver:anoncvs@cvs.freedesktop.org:/cvs/xapps login

(press return at the password prompt)

cvs -d :pserver:anoncvs@pdx.freedesktop.org:/cvs/xapps co xcompmgr

cvs -d:pserver:anoncvs@freedesktop.org:/cvs/xapps co transset

cd xcompmgr

export PKG_CONFIG_PATH=/usr/X11R6/lib/pkgconfig

mv configure.ac configure.ac.intermediate

cat configure.ac.intermediate | sed "s/AC_CONFIG_HEADER/AM_CONFIG_HEADER/" > configure.ac

./autogen.sh

./configure --prefix=/usr

ln -s config.h.in [config.h].in

make

su

[give root password]

make install

exit

cd ../transset/

make

su

[give root password]

cp transset /usr/bin/.

echo 'Section "Extensions"' >> /etc/X11/xorg.conf

echo '    Option "Composite" "Enable"' >> /etc/X11/xorg.conf

echo '    Option "RENDER" "Enable"' >> /etc/X11/xorg.conf

echo 'EndSection' >> /etc/X11/xorg.conf
Update! Wed 10 Nov: with the new NVidia 6629 drivers, you also have to add this line:
Option "AllowGLXWithComposite" "true"
to the Section "Device" of your /etc/X11/xorg.conf file if you want to use the composite options and have GLX / 3d accelleration. The README warns that this may have negative effects on the displaying of OpenGL applications.
5a- If you are using an Nvidia graphics card and using the Nvidia drivers you will want to add this to the Device section of your /etc/X11/xorg.conf file:
Option "RenderAccel" "true"
You will get a noticable speed increase when using this along with the Composite Extension.
5b- Likewise, if you are using an ATI graphics card and using the ATI drivers you will want to add this to the Device section of your /etc/X11/xorg.conf file:
Option "backingstore" "true"
6- Now it's time to play around, for nice shadows you can use (as user):
xcompmgr -cfC &
and just do:
xcompmgr --help
for a list of options.
BTW I now settled on:
xcompmgr -r 15 -o .63 -l -20 -t -20 -I 0.015 -O 0.02 -D 5 -cCfF &
Use:
killall xcompmgr
to go back to normal mode.
7- Likewise, you can do
transset 0.4
which will turn your mousepointer into a cross, just point at any window and left-click to give it the degree of transparency you put after the command transset - 0 means completely transparent, 1 means completely opaque. My desktop now looks like this: 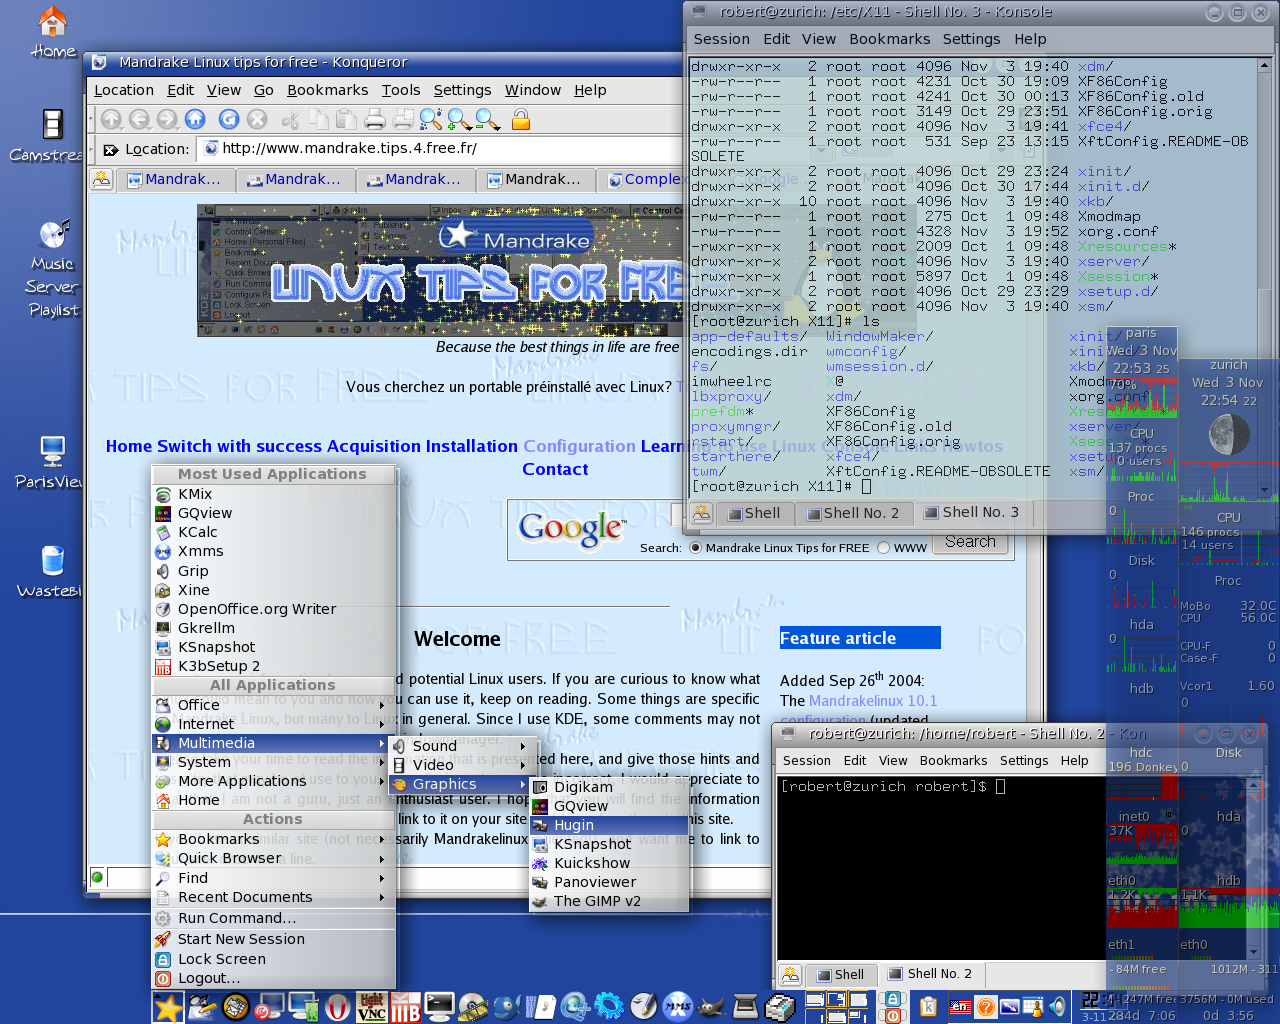
xcompmgr -cfC and you see some transparent/translucent windows, the gkrellm instances are done with transset 0.6 and set 'always on top' since I'll be able to see what's below anyway. What you don't see here is how cool windows and menus open up, blending onto the screen from 'nowhere'.
Issues: window shading doesn't work, and things are not yet at the top of stability I'd say. Speed when switching between virtual desktops leaves things to be desired. Coolness doesn't come without compromise yet, but considering the state of XFree86 of February 2004, I'd say progress has been extremely remarkable. At this pace of development, eyecandy on Linux will soon beat anything anyone else has to offer.
Wireless networking setup
ndiswrapper -i  lsbcmnd.inf

ndiswrapper -l
modprobe ndiswrapper
mcc, networking, lan (not wireless!), manual.
iwconfig wlan0 essid ESSID
ifup wlan0
ifconfig
should show the network configuration.
unzip driver.exe

ndiswrapper -i lsbcmnd.inf (for both drivers, they were in different dirs)

ndiswrapper -l
modprobe ndiswrapper

lsmod

dmesg
urpmi prism2-utils
iwconfig would not give me any wireless device (lo, eth0 and sit0 all got listed as having no wireless extensions.
I used the graphical way via MCC - network & internet - add device to add the definitions on how I wanted to use the wireless device - note that it had been detected and the prism2_usb module had been automagically loaded (and a line 'alias wlan0 prism2_usb' had been added to /etc/modprobe.conf). I did add the option (mcc - hardware - hardware, select wireless device/intersil prism and then on the right side: configure module) to do a reset, this led to the additional line to /etc/modprobe.conf "options prism2_usb prism2_doreset=1".
I had to choose 'configure LAN device' (not 'wireless'..! This also happened to my brother.. don't know if it's because it's a USB /local bus device) to set it up, I chose a fixed ip address, start at boot, gateway, and then some. The related file to that configuration is /etc/sysconfig/network-scripts/ifcfg-wlan0, you could also create that - but why not leave it to the graphical tool, it works fine. (Unless you want more fine tuning than the GUI offers, of course. Luckily the file is also there to tune to your hearts content.)
Next I had to set up my configuration files for the device; in the file /etc/wlan/wlan.conf I made sure the wireless device was stated to be wlan0 (WLAN_DEVICES="wlan0"), and towards the end of the file I put my ESSID and that I wanted my device enabled, so that section looks like this:
SSID_wlan0=myessid"

ENABLE_wlan0=y
cp /etc/wlan/wlancfg-DEFAULT /etc/wlan/wlancfg-myessid
Now that file has to be edited. First I wanted to test without the complication of WEP encryption, so all I did to that file was to comment out lines 40-43 (PRIV* settings). Not sure if it would have worked without that, it might have. (Actually, I did go through some iterations here as well as at other places.)
To now start the device, I had to do:
service wlan start
which actually initialises the usb wlan dongle, with information from the 2 configuration files. (For the fans of graphical wizards, you can start the service through mcc - system - services. Set it to start at boot there too. For command line users, you can do: chkconfig wlan on...)
/sbin/iwconfig wlan0 essid myessid
or some similar command with iwconfig. This doesn't work for this device, the only way to initialise it properly is to have the config files and start the service. In any case, right now, the command:
iwconfig
should give information of wlan0: ESSID, access point info, signal strength, etc. In my case, the green led on the dongle blinks if the proper driver is loaded and the wlan service is started. It should burn without interruption if there is a connection with the access point. If it's off there is something wrong. Note that if starting the wlan service (service wlan start) doesn't work, you may have to unplug and replug the dongle.
With the command:
ifup wlan0
the network device is activated. To get the MAC address,
ifconfig
helps out.Then there was only one thing left to do to do a first trial: set up the wireless router to accept the MAC address of the wireless device, and make sure the ESSID is the same. To be honest, I'm not sure what's first, it works best for me if I plug in the dongle after having started the service, if wlan0 is set to start at boot, it gets automatically started (if not, ifup wlan0 should do the trick). Oh, and if I boot the machine, without the dongle plugged in, I only have to plug it in at some later point and it will connect to the network.
lnxreq_hostWEPEncrypt=true     # true|false

lnxreq_hostWEPDecrypt=true     # true|false

dot11PrivacyInvoked=true        # true|false

dot11WEPDefaultKeyID=0          # 0|1|2|3

dot11ExcludeUnencrypted=true    # true|false, in AP this means WEP is required.
dot11WEPDefaultKey0=xx:xx:xx:xx:xx:xx:xx:xx:xx:xx:xx:xx:xx              # format: xx:xx:xx:xx:xx   or

dot11WEPDefaultKey1=              #         xx:xx:xx:xx:xx:xx:xx:xx:xx:xx:xx:xx:xx

dot11WEPDefaultKey2=            #  e.g.   01:20:03:40:05   or

dot11WEPDefaultKey3=            #         01:02:03:04:05:06:07:08:09:0a:0b:0c:0d

#=======SELECT STATION MODE===================

IS_ADHOC=n                      # y|n, y - adhoc, n - infrastructure


#======= INFRASTRUCTURE STATION  ===================

# What kind of authentication?

AuthType="sharedkey"            # opensystem | sharedkey (requires WEP)
Finally, with: MAC address access restrictions on the AP, 128 WEP encryption and a non-broadcast ESSID (this is a setting on the AP), I am now sure to have a nice wireless LAN setup.
Conclusion
Here I used to finish with: Some other things: I haven't taken the time yet to figure out how to get the webcam to do vga resolution. I did try the same things as with 10.0, but for the moment to no avail.. but as you've been able to read above, this is fixed too. Let's hope in the future this webcam driver gets included in the kernel, so no extra action will be required.
Feedback

All contents © copyright 2003 - 2007, unless mentioned otherwise, published under the GNU Free Documentation License (FDL) by aRTee. Artwork and CSS don't fall under the FDL, standard copyright applies. Tux image from Larry Ewing. You may use anything published under the FDL on this site freely, as long as you include this copyright notice and a reference to the main address of this site: www.mandrake.tips.4.free.fr.


