Installation walkthrough of Mandriva Linux 2007.1 Spring
Related links
Older installation walkthroughs:
Mandriva Linux 2006
Mandriva Linux 2006 Limited Edition
Mandrakelinux 10.0 Community Edition
Mandrakelinux 9.2
Mandrakelinux 9.1
Site news
Latest site additions:
Updated January 13rd 2008:
My LIRC page: The Linux Audio Server Project - Revisited
Added January 3rd 2008:
My (K/X/)Ubuntu review: Ubuntu - beyond the hype
Added December 2nd 2007:
My Mandriva 2008.0 review
Added November 20th 2007:
The configuration page of Mandriva Linux 2008.0
Added November 18th 2007:
The Installation walkthrough of Mandriva Linux 2008.0
Added November 17th 2007:
The review of openSUSE 10.3
Added July 8th 2007:
The Configuration page of Mandriva Linux 2007.1 Spring
Added July 1st 2007:
The Installation walkthrough of Mandriva Linux 2007.1 Spring
Added December 18th 2005:
The third and final part of my Mandriva Linux 2006 review
Added November 14th 2005:
The second part of my Mandriva Linux 2006 review
Added November 6th 2005:
The first part of my Mandriva Linux 2006 review
For older additions please see the articles page.
This page describes the installation I did with the free and freely available download dvd of Mandriva Linux 2007.1. I have installed it and run it on my laptop (madeira) (see also the hardware specifications page).
To those who've already used or seen a graphical Linux installer this may not be exciting, but those who haven't and are curious are invited to give this page a good read. I hope that this information will help some uninitiated to take the plunge and give Linux a try.
I used 'use existing partitions' and 'install' instead of upgrade. As has been the case since years, it seems that in most cases 'upgrade' works fine, but in some it doesn't. Your mileage may vary; if you use the 'upgrade' function and you have problems, you may first want to do a clean install to see if that helps. BTW, a clean install is usually faster anyway, since there are no dependencies of the packages that get replaced to be checked.
Note: whenever upgrading doesn't work, it's because some essential thing has been changed in the inner workings of the system. This can be fixed if you know how, but in that case you'd not likely be reading these pages...
I have several partitions that I use as root partitions so that I can multiboot different systems; I now have a simple standard lilo bootloader in the MBR (master boot record) which is set to chainload any of the 4 system (root or '/' ) partitions that I have prepared on my harddrive. The bootloader of each new installation then goes into the start of the partition that I put that system on.
I used the standard method of installing by means of the downloadable dvd this time. There's also a boot image that supports lots of installation methods: FTP, HTTP, NFS, local harddrive image, local harddrive files.
A last remark: it will pay off later if you create an extra partition that can serve as root partition for subsequent linux installations, for instance for beta/rc testing.
It seems I cannot stress this enough; read the forums, there are still so many posts of people who go like: "I wish I hadn't given up my nice installation of Distro X to try out Distro Y which I now find is totally disappointing to me.." but usually with stronger wordings...
As I wrote before, on my laptop I have 4 such partitions, and currently I have Mandriva 2007.0, Spring KDE-One 2007.1, and Mandriva 2007.1 32-bit Powerpack alongside the 2007.1 Spring 64 bit edition that is now my main system.
The installation itself
Just put the dvd or the first cd in the tray and reboot the pc; then type enter when you get to the question if you want to install, upgrade or other.
I will now just give some tips and explanations on what and how I do things, along with the screenshots I made during the install on my laptop (just hit F2 to make a screenshot, you can find them later in /root/DrakX-screenshots/). Note that I have chosen to resize the screenshots, the normal resolution is 800x600 (SVGA). You can click each image to get the normal size screenshot.
The following parts are in the installation; I've intermittently put my comments, whereever I have tips to spare.
Choosing Your Language
License Terms of the Distribution
Install type
Keyboard selection
Security level
Hard disk partioning
|
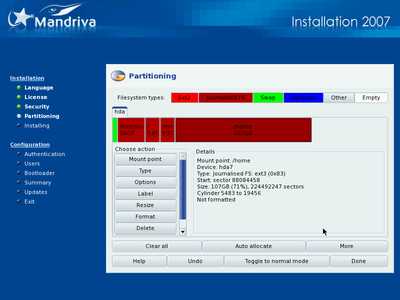
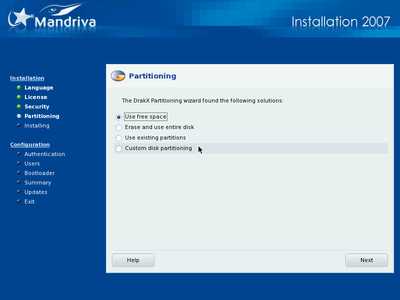
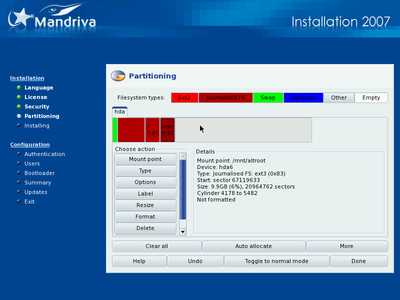
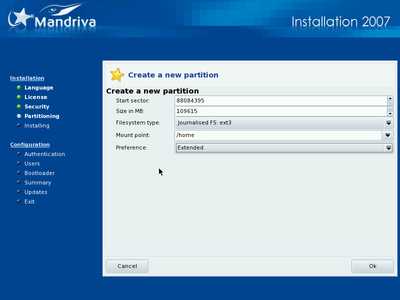
Select whether you want to use the free space on the hard drive, use existing partitions, erase the entire disk, reduce the size of your windows partition to make place for your Linux system or do your own custom setup. BTW this screenshot doesn't show the option to use the free space on the hard drive, since there my hard drive was completely partitioned, nor the option to reduce the size of my windows partition since I don't have any windows partitions. In case you do have Windows partitions, and your whole drive is partitioned so you can't use free (unpartitioned) space, DiskDrake can resize the Windows partition. However, sometimes there's data at the end of a partition, and in the case of NTFS partitions (Win2k and WinXP standard partition types), this data cannot be moved by DiskDrake. So you will have to boot into Windows, run a defragmenter, until there's enough space at the end of the partition to shave off enough for your Linux system. Note that some defragmenters for whatever reason, leave some data somewhere toward the end of the partition. Once I had to defrag, run the linux installer with DiskDrake (no live cd at hand at that moment), resize as much as possible, boot to windows again and defrag again, to have some more free GBytes at the end, etc... until there was the desired amount of space available for the required Linux partitions. Currently, I recommend to make root (system) partitions between 6 and 10GB - rather more (8 to 10GB) if you intend to install a 64 bit system, you may have to have quite some duplicate libs; if you know you're not going to install loads of software, 4 to 5GB may well be enough. But with the current sizes of hard drives, even in laptops, why would you try to save a GB or two? Better safe than sorry. It also depends on whether you want to copy the installation media to your hard drive - see the Installation media copy-step below. In any case, making your root partition larger than 15GB is not useful. For more comments on disk partitioning, read my Mandrake 9.1 installation page. As always, I really recommend to create a spare partition (at least one - as you can see, I have four partitions that I can use as a system or 'root' partition, so I can multi boot 4 different systems) that can later be used as root partition to an alternative system. With harddrives of 120GB and more (even on laptops - I have a 160GB drive) being todays standard, some extra 10GB that lies unused 'just for when you want to use it' is not an issue, whereas throwing out your working system for some new hyped system that happens to be 'not all that' in your specific case is a real shame. |  |
| All partitions have been determined, including their mount points. Click 'done' to finish. |  |
Formatting of partitions
| There's a progress indicator informing you how the formatting is proceeding. |  |
Installation media copy
Additional installation media
| This dialog allows you to indicate which other media sources you have. I didn't set this up during installation. |  |
Package selection
| The installer checks which programs can actually be installed. The group selection allows for quick installation of the most common applications per subsection. |  |
| This is my usual selection lately; I used to include LSB and some servers, nowadays I just go through individual package selection for OpenSSHserver, TightVNCserver and then some. |  |
Server packages security issue
System installation
Setting the administrator (root) password
| Choose a password that you can remember, but bear in mind: anyone with physical access to your machine can easily change it (not necessarily find out what your password is, but set a new one. See the howto page on how to do that). |  |
Create user accounts for your system
Autologin
Boot loader
Summary and configuration
| This is the summary screen; you can (re)configure plenty of hardware here, from your mouse, keyboard, audio, graphics card to your internet/ethernet connection. |  |
| Scrolling down shows some more things to configure. Minor change compared to Mandriva 2007.0 is that there's no longer a printer configuration section here. It's been moved to post install. |  |
Summary -- Country and Region
| Here you can choose your location - I had to fix this since the main language I chose is British English, and so the system presumed London, England as location. |  |
Summary -- Timezone
| The next thing I did was choose the city for the proper timezone. Switzerland is in one zone, but ah well, it's easy enough to select Zurich in this dialog. |  |
Summary -- Graphic Card & Monitor configuration
| In this screen I made sure the 24 bit mode was selected with the correct resolution. |  |
| Finally there's an overview to see if all is well. |  |
Summary -- Network
| Choose which connection to configure. In my case, it's my LAN connection. |  |
| Select the interface to configure. |  |
| I left turned off 'start the connection at boot' since I knew I would normally actually use my wifi connection. |  |
| You can opt to start the connection right away, to test it - before it used to be necessary to set up a network printer, but now the configuration of the printers has been moved to post installation. |  |
| Great, all done. |  |
| Now I tried to configure the wireless interface. |  |
|
It was detected properly, giving a bit of hope... I knew this might not work, since this is the installation of the 'Free' edition, which excludes anything not open source. |  |
Install updates
End of installation
| Done! It took just about three quarters of an hour, including my package selection by hand,... not bad for a full system install. |  |
Final remarks
The installation was problem free and straightforward, as it has been since quite a while. The first boot screen of the installation disc looks much more polished than before, nice graphics and slick blending in of the Mandriva name. But more importantly, the installation disc holds some useful options - alongside the common 'repair system' there's also an option to run a hardware RAM memory test (memtest86), and the installation setup has more features and a clearer help/info system.
There were some notable changes apart from the improved looks; now, as many other distributions, Mandriva comes with GRUB as a default bootloader, and the printer configuration has been taken out of the installation process.
In the mean time, I have installed the Powerpack 32 bit edition and the Free 64 bit edition of Mandriva 2007.1 Spring on a number of machines (mostly laptops) and I must say that in all cases, things went as smoothly as in this walkthrough - or better. For instance, the Powerpack has wifi working out of the box on many laptops. The same goes for proprietary graphics drivers (NVidia, ATI).
All in all, the installation of Mandriva 2007.1 Spring is again a step up from the already fine 2007 (autumn 2006) Mandriva edition.
Happy installing!
aRTee
Discussion and feedback
If you want to give me feedback you can get to me via my contact info (link at the top) or in this topic: http://mandrivausers.org/index.php?showtopic=42567. I'll be tracking that topic, so as soon as you add a message I will be notified and read up on your comments. That forum is also great for help in case of problems.
All contents © copyright 2003 - 2007, unless mentioned otherwise, published under the GNU Free Documentation License (FDL) by aRTee. Artwork and CSS don't fall under the FDL, standard copyright applies. Tux image from Larry Ewing. You may use anything published under the FDL on this site freely, as long as you include this copyright notice and a reference to the main address of this site: www.mandrake.tips.4.free.fr.


