|
Configuration of Mandrake Linux 10.0 Community Edition
Note: this page is not completely finished, I gave preference to finishing my ML10.0CE review first; there may be some minor additions.
First of all, I have to admit that this page is maybe more for me than anyone else; plenty of things I will put here are focused on how I set up my box/hardware; so that next time (if any), I will not have to figure out what I did to get things going the last time. And if you wonder why I'm thinking of installing again: simple, if Mandrake/linux is to get better, what else to do then to test the betas and release candidates and report bugs?
Note: if you want you can still read my config page of Mandrake 9.2, on which this page is largely based.
By the way, some of these instructions are very much related to the hardware that I'm installing this on, so I have added the spec of my system (both hardware configuration and software config files).
Note:
commands to type have this colour and font
keystrokes/presses have this colour and font
cli = command line interface

lmb = left mouse button, mmb = middle mouse button, rmb = right mouse button
Most of the commands in this and subsequent sections are executed as root, use the command su and give your root-password when prompted to become 'root' and then execute those commands.
Resources configuration steps
Read the Resources Configuration and Software Install HowTo by Zeb first, and follow up the info given there. In case you cannot get to the mentioned clubmember info to configure your resources, you may have to go to the easy urpmi page, that is slightly more difficult since for Mandrake 10.0 the page has not been updated. So in that case, get the links for Mandrake 9.2 and check with your webbrowser if/where on the same ftp-server the 10.0 files reside. Note that it is possible that the (relative) location of the hdlist file is not the same as for Mandrake 9.2. I'm currently just using the rpm's that I downloaded when using Beta2 and RC1 from cooker, and in some cases rpm's for 9.2. This is probably not to be adviced.
After configuring the repositories, it is really easy to install software, with RPMDrake (Mandrake Control Centre - Software Management) or urpmi.
urpmi [packagename(s)]
Installs the package / program; it automatically gets all dependencies. Note also that you can put more than one programname/packagename in one command.
urpmi --noclean [packagename(s)]
is actually what I use most of the time, since then the downloaded files are in /var/cache/urpmi/rpms/
where I can easily retrieve them to use again on another computer for instance. Next to --noclean, other interesting options are --fuzzy and --test.
Hint: if you have the iso images of Mandrake 10.0 on your harddisk and you want to set your system up so that it installs any new packages from those images (so you don't have to deal with inserting cd's anymore -- nor with trying to find them), you can do what I did (maybe there are easier ways, but this works for me; naturally, if you install your system with a bootfloppy and the iso's on your harddisk, I suppose you don't need to do this). As root, do the following (all you have to change is the path to your iso images, for the rest it's cut and paste without touching the keyboard):
mkdir /mnt/mdk100iso1

mkdir /mnt/mdk100iso2

mkdir /mnt/mdk100iso3

mkdir /mnt/mdk100iso4

mount -t iso9660 -o loop /path/to/MandrakeLinux-10.0-Download-CD1.i586.iso /mnt/mdk100iso1

mount -t iso9660 -o loop /path/to/MandrakeLinux-10.0-Download-CD2.i586.iso /mnt/mdk100iso2

mount -t iso9660 -o loop /path/to/MandrakeLinux-10.0-Download-CD3.i586.iso /mnt/mdk100iso3

mount -t iso9660 -o loop /path/to/MandrakeLinux-10.0-Download-CD4.i586.iso /mnt/mdk100iso4

mkdir /mnt/mdk100

mkdir /mnt/mdk100/Mandrake

cd /mnt/mdk100/Mandrake

ln -s /mnt/mdk100iso1/Mandrake/RPMS .

ln -s /mnt/mdk100iso1/Mandrake/base .

ln -s /mnt/mdk100iso2/Mandrake/RPMS2 .

ln -s /mnt/mdk100iso3/Mandrake/RPMS3 .

ln -s /mnt/mdk100iso4/Mandrake/RPMS4 .
To make sure the iso images get mounted each time you boot, you could add the exact mount commands as above to /etc/rc.local or you can mess with /etc/fstab.
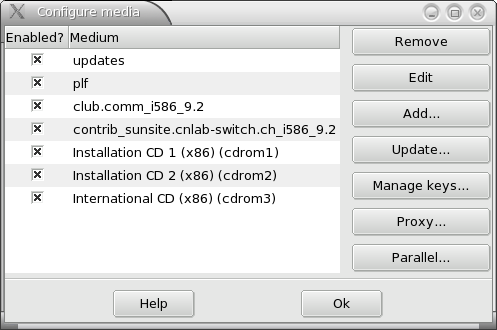
After this I set things up in the Mandrake Control Center, Software Management section, Software Media Manager; I just selected the cdroms 1 to 3 in turn and had the path point to the links I had just created. (See screenshots below.)
If you have the cd's and nothing on your harddrive, just copy the RPMS directories to a directory named Mandrake, and don't forget to copy the base dir on the first cd too. Then adjust the paths as shown below.
In the Mandrake Control Center, go to the Software Management section (following images for Mandrake 9.2 but it works exactly alike for Mandrake 10.0)
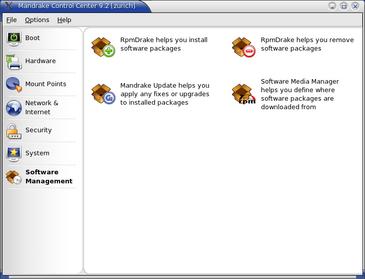
and start the Software Media Manager
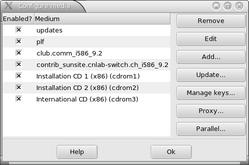
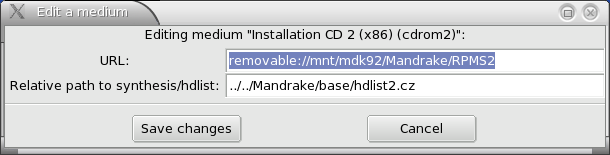
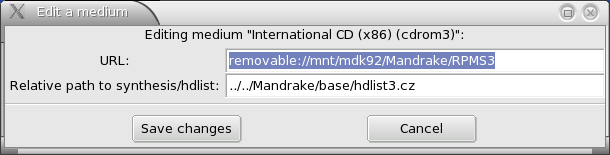
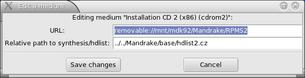
Select and edit each of the three cd entries so they look like this:
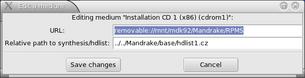
Each time you click 'ok' to confirm, the system will check if the paths are correct, and it will update the database.

As a knowledgeable reader commented, you could do the last thing on the commandline too; it's just a matter of editing /etc/urpmi/urpmi.cfg. In that case however, the system won't check right after you make the modifications so you have to check if the changes were correct.
One more thing that I started doing during ML10.0CE beta testing: I moved the dir /var/cache/urpmi to /home/urpmi[version-indication] and made a link to the latter from the location of the former, so that all rpm's downloaded with urpmi --noclean [packagename] would not be lost if I installed the system again on the same / (root) partition.
Nvidia 3d driver
You can follow my instructions here. Note that you have to have the correct sources installed - they are on the 3rd installation disc. Use the command
urpmi kernel-source
to install the correct package. Note that luckily, Mandrake 10.0 comes with the kernel source (contrary to Mandrake 9.2). I had to put nvidia in the file /etc/modprobe.preload to get X to start at boot - after changing my kernel (from the regular one to the 4GB supporting one - during installation the 'enterprise' kernel was slated for install, but I declined) and reinstalling the nvidia driver. I don't know why, for some reason the first time I installed it everything went fine, but with the other kernel somehow the nvidia module would not get loaded.
Webcam and pci soundcard problem
With the download edition kernel, there is a problem with the usb-snd-audio driver; since my webcam is a usb cam and since it has a microphone, the system runs into this problem: the audio mixers show only one microphone and nothing else. I did:
echo "usb-snd-audio" >> /etc/hotplug/blacklist
to get around this problem. That was creating another problem, namely that I didn't get SDL audio working. Since that is used for many games, including Pathological, Frozen-Bubble, Majesty, the UnrealTournament2004 demo and the Savage2 demo that I recently tried out, this is not so cool. After a lot of fiddling (which means this page got delayed by at least a day), I found out that things work properly if the following lines are added to /etc/rc.local
# fix for audioproblem webcam, by aRTee:

rmmod snd-usb-audio

service sound stop

service alsa stop

rmmod audio

modprobe snd-emu10k1

modprobe snd-usb-audio

modprobe audio

service sound start
That took me quite some time. I had this problem on RC1 and Beta2 as well, here's my bugreport: http://qa.mandrakesoft.com/show_bug.cgi?id=8004
Thanks to Dave Girard (who's additional solution you will find on this link, I modified my solution) for the addition of the modprobe snd-usb-audio command to still have the use of the microphone of the webcam. Note that in this order (before the 'modprobe audio' command) it does actually show up in kmix - there will be a selection label to choose between the normal audio card and the usb device. (Dave, hope you got that last bit too, just a tad more polish.. ;-)
To be able to have VGA resolution on my webcam, which needs a proprietary driver, there is some more magic needed that I have not had the time to figure out. If you know how, feel free to contribute.
Update! I have managed to get things running with VGA resolution on the webcam. I got the drivercode from http://www.smcc.demon.nl/webcam/release.html and built the pcwx driver; I went through the whole thing, including patching the source code of the kernel, got everything working, and a new kernel came out. I just installed this new kernel (2.6.3-7mdk) and put the pwcx module in the right location, to find that it still worked ok. You can just take the 8.4 version and untar it - it contains a ready built driver inside: pwcx-8.4/2.6.0/gcc-3.2/pwcx.ko. Just put the driver (as root) in: /lib/modules/2.6.3-7mdk-i686-up-4GB/kernel/drivers/usb/media/pwcx.ko if you're using kernel 2.6.3-7mdk-i686-up-4GB, if not, substitute that string with the correct one for your kernel. Run, as root,
depmod -a
and then
modprobe -f pwcx
and if all is well, you will now have VGA resolution on your webcam, check with camstream or SDLcam or so.
You can do an
echo "modprobe -f pwcx" >> /etc/rc.local
to have the module loaded upon boot.
System monitoring
To be able to keep an eye on the state of my system, I use gkrellm; to have cpu-temperature and motherboard voltage readouts, lm-sensors is needed. To install those, do:
urpmi lm_sensors gkrellm
Next to setup the sensor system:
sensors-detect
and just followed instructions (just accepted all default proposals). This creates the file /etc/sysconfig/lm_sensors which indicates which modules must be loaded for lm_sensors to function properly. sensors gives the output from the sensors on the motherboard if the necessary modules are loaded. Of course the program gkrellm is much nicer for continuous display of your system stats (note that on the mobo and cpu temp in gkrellm I have to use a factor of 0.1 to get the right value; this apparently happens with certain sensors/chipsets/mobos). I noticed that the fanspeed of the CPU fan and the casefan are actually detected, but it seems at the low revs they make, the BIOS actually sets the value to 0...
K3B configuration
Contrary to older Mandrake versions, no setup was necessary. Kernel 2.6 can burn directly to ide devices without using ide-scsi emulation, and Mandrake has packaged K3B in a way so that it can also burn dvd's. You may need to install the dvdtools if not yet available on your system.
DVD playback with mplayer and xine (and frontends to those)
Now the stuff that is necessary to watch dvds (that Mandrake, or any other linux vendor for that matter, is not able to include, since it would violate some stupid US law) has to be installed:
urpmi libdvdcss
will get the necessary decryption to have xine or mplayer playback dvds without any problems. (Btw, if you start mplayer from the cli but you want the gui version and/or rightclick menus, just type gmplayer instead of plain mplayer... Of course you need to have the gui version installed, urpmi mplayer-gui to get it.)
Home LAN computer names
I did the following to set the hostnames so that with CUPS I could print over the network (if not set, there will be a problem between the ethernet address and the name that is given during installation; other hosts will not know the host with the printer by name, just address, but the name plus printer will show up in the cups www control panel), modify /etc/hosts to include the ethernet address and the name by which the host is known to itself.
echo "192.168.0.1  paris" >> /etc/hosts

echo "192.168.0.2  neuchatel" >> /etc/hosts
This way, the client can find the host that has the printer connected to it since it can do address translation from the host name to the right ethernet address. Naturally, CUPS is just one example; this makes it possible for my machine to know all other machines by name, from web browsers to ssh and ftp on the command line.
Setting up the IR Remote Control
To get the remote control that came with my tv-card working, I needed LIRC, so I issued the following commands, as root:
urpmi lirc lirc-remotes

cp /usr/share/lirc-remotes/hauppauge/lircd.conf.hauppauge /etc/lircd.conf

cp /usr/share/lirc-remotes/hauppauge/lircmd.conf.hauppauge /etc/lircmd.conf

vi /etc/sysconfig/lircd
where I changed the following things:
DRIVER=UNCONFIGURED into: DRIVER=default
and:
HWMOD=UNCONFIGURED I replace with the following 2 things:
HWMOD=lirc_dev

HWMOD=lirc_i2c
Finally, to start things I issued these 2 commands:
service lircd start

service lircmd start
For the lircmd there are some extra things necessary in the /etc/X11/XF86Config-4 file, namely the extra mouse section and the related mouse setting in the server section at the end of the file.
These are the relevant lines:
#added aRTee:

Section "InputDevice"

    Identifier "LircMouse"

    Driver "mouse"

    Option "Device" "/dev/lircm"

    Option "Protocol" "IMPS/2"

    Option "Buttons" "5"

    Option "ZAxisMapping" "4 5"

EndSection
and at the end:
Section "ServerLayout"

    Identifier "layout1"

    InputDevice "Keyboard1" "CoreKeyboard"

    InputDevice "Mouse1" "CorePointer"

# added aRTee

    InputDevice "LircMouse" "SendCoreEvents"

    Screen "screen1"

EndSection
I just continued to use the file (that at the time I created with a lot of trial and error) in my homedir ~/.lircrc that makes lirc and mplayer work together. Make sure you do switch on lirc support of mplayer and xine. And voila. So now I can move the mouse with the remote, fully control mplayer from the sofa, go through menus in xine, like with a normal dvd player.
KDE / graphical user interface configuration steps
Most of the following things are done by the user, in the users home directory (/home/[user]) or with gui tools. Note that I did most of this before, I just continued to use the same /home partition and home dir.
First things first, which for me means to get usable (windows) behaviour. Meaning: not the standard behaviour that the most used OSes have, but something that you (I really) can actually work with. I want/need/require (hey it's my machine, I can require things of it, right?) the following:
- window focus follows mouse (meaning, the window that the mouse pointer is on/in is the one that is active, so when I type it will go into that window)
- clicking in any window with the lmb, mmb or rmb does not bring the window to front (meaning, I can actually select something in a window with the lmb without the window popping to the front)
- move a window without having it on top
- move a window without having to go to the window frame with the mouse pointer
- resize a window without having it on top
- resize a window without having to go to the window frame with the mouse pointer
- bring a window to the front without having to go to the window frame with the mouse pointer
- send a window to the back without having to go to the window frame with the mouse pointer
- single click on icons to launch applications or descend into folders
It must be my lucky day, because all this can easily be done with KDE. Actually, points 3 to 8 are readily available already, without having to change anything in the settings. Note that point 7 is necessary since I wanted that clicking in a window does not bring it to front (which is the case in the standard less usable behaviour). 3 and 4 is done with alt+lmb, 5 and 6 with alt+rmb, 7 and 8 with alt+mmb. To get 1 and 2, start KDE control center: Menu => what to do => administer your system => configure KDE. (Alternatively there are entries for all subsections of the KDE control centre in Menu => Configuration => KDE, but we'll be doing more than just this.)
I have gotten a bit creative and made a shockwave flash page (warning: ~600KB) on what this behaviour looks like.
Now expand the LookNFeel section by clicking on the plus sign in front of it. Go to Window Behavior, and choose the Policy: Focus Follows Mouse; then unselect 'auto raise' and 'click raise'. At the top, go to the second tab 'Actions' and in the 'Inactive Inner Window' make sure all three entries say: 'Activate & Pass Click'.
The lower part should have alt as the modifier key, and lmb+mod key=move, mmb+mod key= toggle raise & lower, rmb+mod key = resize. Don't forget to click apply at the bottom.
Now that we're here, we may as well set the single click part, so that a single click on a desktop icon will do to launch whatever is being clicked. Expand (on the left side) the Peripherals section, select the 'mouse' entry, and select 'Single-click to open files and folders' in the Icons-section. BTW in the 'Advanced'-tab you can adjust the speed of the mouse (among other things) if it's not to your liking.
Now that the KDE CC is open anyway, let's expand the 'LookNFeel' section again, and select 'Behaviour'. If you don't want to have icons on your desk with /mnt/cdrom2 /mnt/cdrom /mnt/floppy written to them, you can deselect the 'Display devices on desktop' checkbox. Hint: if you then right click on your desktop and select Create New => Link to Location (URL) you can just add a name, like: my dvdrom and a location: /mnt/cdrom2 (which is where my dvdrom gets mounted; check that in /etc/fstab).
Something else that I like is Icon Zooming, in case you don't know you can check out what that looks like (~320KB). Right click the panel and select 'Panel Menu' => 'Configure Panel', in the new window that opens select the 'Appearance' entry on the left side, and tick the box: "Enable icon zooming". This dialog is also in the 'look and feel - panel' section of the KDE Control Center.
Setting up the extra mousbuttons on my Logitech MX700
To be able to use the extra mouse buttons that I have on my MX700 wireless optical USB mouse I did the following:
urpmi imwheel
as root, and as my regular user:
echo "#!/bin/sh" > ~/.kde/Autostart/mx700backforth

echo "killall /usr/bin/imwheel" >> ~/.kde/Autostart/mx700backforth

echo "imwheel -k -b "67"" >> ~/.kde/Autostart/mx700backforth

chmod +x ~/.kde/Autostart/mx700backforth
plus, of course the following (also as normal user, in the home-dir) to make the right .imwheelrc:
echo '".*"' > ~/.imwheelrc

echo "None, Down, Alt_L|Left" >> ~/.imwheelrc

echo "None, Up, Alt_L|Right" >> ~/.imwheelrc
With these settings/files the thumb buttons on the mouse are "back" and "forward" in browsers/konqueror, and the wheelbuttons function as if the wheel is continuously being scrolled respectively up or down. My /etc/X11/XF86Config-4 mouse section contains the following (only the relevant section is shown here; you can also have a look at my whole /etc/X11/XF86Config-4):
Section "InputDevice"
    Identifier "Mouse1"
    Driver "mouse"
    Option "Protocol" "ExplorerPS/2"
    Option "Device" "/dev/mouse"
    Option "ZAxisMapping" "6 7"
EndSection
Note also that the 2.6 kernel works in a way that usb and ps/2 mice both work, no extra section is required anymore, except for the LIRC mouse daemon lircmd.
Setting up java in Konqueror, Mozilla and Opera
To install java, just do:
urpmi j2re
then set up your browsers to use java. I used the 9.2 java rpm that I kept.
Konqueror: Settings > configure Konqueror > Java & Javascript: enable Java globally.
Opera: File > Preferences > Multimedia, add (and validate, it might differ slightly from mine) the path: /usr/lib/jdk-1.4.2_01/jre/lib/i386/
Mozilla: Edit > Preferences > Advanced, enable Java
Conclusion
The webcam-sound card problem was nasty and cost me quite some time, I hope Mandrake will fix this before Mandrake Linux 10.0 Official Edition (ML10.0OE). I have mentioned this on the cooker buglist. I hope that people will really send in bug reports of all things, major and minor, that they come across, so that ML10.0OE will really be a very polished distribution.
Some other things: I haven't taken the time yet to figure out how to get the webcam to do vga resolution with the 2.6 kernel series. Also, it would be nice to use the mic on the webcam. Let me know how if you know.
On the other hand, I didn't have to add anything to make sure that both my mice, PS/2 and USB, work properly, it just works. To get the extra thumbbuttons on my MX700 to work was also easier than before. Same goes for K3B, no setup required anymore, it just works. The audio mixers are for once not muted, and kmix doesn't show a zillion controls for my audigy2, but actually quite logical slide-controls, and an advanced tab.

Page first created: March 9th 2004. Page last updated:
May 16 2004
| |