
Configuration of Mandriva Linux 2006
Related links
easy urpmi setup
urpmi HowTo
Mandriva Linux 2006 Release Notes
Mandriva Linux 2006 Errata
DKMS: dealing with proprietary drivers
For your reference: previous configuration pages
Mandriva Linux 2005 LE
Mandrakelinux 10.1
Mandrakelinux 10.0
Mandrakelinux 9.2
Mandrakelinux 9.1
Site news
Latest site additions:
Updated January 13rd 2008:
My LIRC page: The Linux Audio Server Project - Revisited
Added January 3rd 2008:
My (K/X/)Ubuntu review: Ubuntu - beyond the hype
Added December 2nd 2007:
My Mandriva 2008.0 review
Added November 20th 2007:
The configuration page of Mandriva Linux 2008.0
Added November 18th 2007:
The Installation walkthrough of Mandriva Linux 2008.0
Added November 17th 2007:
The review of openSUSE 10.3
Added July 8th 2007:
The Configuration page of Mandriva Linux 2007.1 Spring
Added July 1st 2007:
The Installation walkthrough of Mandriva Linux 2007.1 Spring
Added December 18th 2005:
The third and final part of my Mandriva Linux 2006 review
Added November 14th 2005:
The second part of my Mandriva Linux 2006 review
Added November 6th 2005:
The first part of my Mandriva Linux 2006 review
For older additions please see the articles page.
This page describes how I configure Mandriva on my systems.
Plenty of things I put here are focused on how I set up my hardware; so that next time (if any), I will not have to figure out what I did to get things going the last time. And if you wonder why I'm thinking of installing again: simple, if Mandriva and Linux are to get better, what else to do then to test the betas and release candidates and report bugs?
By the way, some of these instructions are very much related to the hardware that I'm installing this on, so I have added the spec of my systems (both hardware configuration and software config files).
This time I installed on my wifes desktop machine (neuchatel), my own desktop (zurich) and my laptop (samos). I did an ftp installation on both desktop machines with the dvd iso image on my server (paris) mounted in loop mode. The laptop got installed from the iso image that I first copied onto the internal harddrive. It would be nasty if I realise I forgot to install something when I'm away and have to make do with a slow internet connection. All three installs were initiated with a cdrom (cdrw actually) that I burnt the boot.iso onto. You can find this image in the dvd, the path is: "install/images/boot.iso". This image supports ftp, http, nfs and local harddrive installation.
In all cases, the system knows about the existance and whereabouts of the packages on the dvd image, which resides either on the built-in harddrive or on the server. So only other repositories will have to be added.
I have used the clubmember Powerpack dvd which contains more than the public download edition will, such as NVidia and ATI graphics drivers, Sun Java, Flash and then some. All of these can be obtained in other ways, but the Powerpack dvd is naturally much more comfortable.
Note:
commands to type have this colour and font
keystrokes/presses have this colour and font
cli = command line interface

lmb = left mouse button, mmb = middle mouse button, rmb = right mouse button
Most of the commands in this and subsequent sections are executed as root, use the command su (and give your root-password when prompted) to become 'root' and then execute those commands.
Updates to this page
Update! October 14th: To have vga (640x480) resolution with pwc (Philips) based webcams, one needs merely to execute:
urpmi dkms-pwc

rmmod pwc

depmod -a

modprobe pwc
to get the highest non-interpolated resolution this hardware can offer. Naturally, after a reboot, there's nothing to repeat of all this, it just works. Programs that may be of interest with the webcam are for instance Camstream (urpmi camstream).
Update: October 30th: added the Bluetooth networking and the Bluetooth Phone sections, almost the same as on Mandriva 2005LE.
Resources configuration steps
To get a hold of the true power of urpmi, the Swiss knife of rpm-installing, you must first set up your sources/repositories. I'm assuming a functional internet connection at this point.
So head on over to the easy urpmi page and follow the 3-step instructions. Most important are plf and necessary for that the contrib media repositories, as playback of encrypted dvds and various other things will not be possible without plf-free and plf-nonfree. Quite a few things are not on the dvd, so it pays off to add main too. I had a quick look and if you count the amount of data in main and contrib you get close to 10GB, quite a bit more than fits onto one single layer dvd...
For more information on setting up urpmi, read the Resources Configuration and Software Install HowTo by Zeb.
After configuring the repositories, it is really easy to install software, with RPMDrake (Mandrake Control Centre - Software Management) or urpmi.
urpmi [packagename(s)]
Installs the package / program; it automatically gets all dependencies. Note also that you can put more than one programname/packagename in one command.
urpmi --noclean [packagename(s)]
is actually what I use most of the time, since then the downloaded files are in /var/cache/urpmi/rpms/
where I can easily retrieve them to use again on another computer for instance. Next to --noclean, other interesting options are --fuzzy and --test. Next to urpmi you can use urpmf [programname] to find out which package contains what program (for instance, urpmi kgoldrunner won't do you any good, you'll want kdegames...) and urpme [packagename] to remove packagename from your system. Comes in handy if kat really takes up too many resources.
Nvidia 3d driver
For Mandriva Linux 2006 I used the Powerpack dvd and so I didn't have to install the driver by hand. Since many will have to do so, I decided to keep this information here anyway. You can follow my instructions here (the most recent nvidia driver package is NVIDIA-Linux-x86-1.0-7676(?something)-pkg1.run by now, bear that in mind when reading that page). Note that you have to have the correct kernel sources installed. Use the command
urpmi kernel-source
to install the correct package.
As with Mandrakelinux 10.1 and Mandriva Linux 2005 LE nvidia had to be put in the file /etc/modprobe.preload to get X to start at boot, after installing the nvidia driver.
You may want to use dkms for this driver.
System monitoring
To be able to keep an eye on the state of my system, I use gkrellm; to have cpu-temperature and motherboard voltage readouts, lm-sensors is needed. To install those, do:
urpmi lm_sensors gkrellm
Next to setup the sensor system:
sensors-detect
and just followed instructions (just accepted all default proposals). This creates the file /etc/sysconfig/lm_sensors which indicates which modules must be loaded for lm_sensors to function properly. sensors gives the output from the sensors on the motherboard if the necessary modules are loaded (the modules that need to be loaded should by now be in /etc/sysconfig/lm_sensors, you can load them by hand and things should be ok). Of course the program gkrellm is much nicer for continuous display of your system stats (note that on the mobo and cpu temp in gkrellm I have to use a factor of 0.1 to get the right value; this apparently happens with certain sensors/chipsets/mobos). I noticed that the fanspeed of the CPU fan and the casefan are actually detected, but it seems at the low revs they make, the BIOS actually sets the value to 0 most of the time...
DVD playback with mplayer and xine (and frontends to those)
Now the stuff that is necessary to watch dvds (that Mandrake, or any other linux vendor for that matter, is not able to include, since it would violate some silly US law - although recently an enlightened judge has hinted that breaking that law for personal use of legitimately obtained non-illegal ware, i.e. to watch a dvd you bought on your Linux system, does not count as a violation...) has to be installed:
urpmi libdvdcss
will get the necessary decryption to have xine or mplayer playback dvds without any problems. (Btw, if you start mplayer from the cli but you want the gui version and/or rightclick menus, just type gmplayer instead of plain mplayer... Of course you need to have the gui version installed, urpmi mplayer-gui to get it.)
I have done some more digging, and on the Videolan site where libdvdcss is housed I found the info I have been looking for for quite a long time: on Linux with libdvdcss, the region code of your drive is not relevant, nor is the region code of the discs you play. The RPC2 counter just doesn't count, on drives that have no region set yet, this will stay that way - this I verified myself. You can check the drive's region on Linux with dvd_region.c which you can get from here.
Oh, for playback of various video formats, you may want to do, as root:
urpmi win32-codecs xine-win32
Home LAN computer names
I did the following to set the hostnames so that with CUPS I could print over the network (if not set, there will be a problem between the ethernet address and the name that is given during installation; other hosts will not know the host with the printer by name, just address, but the name plus printer will show up in the cups www control panel), modify /etc/hosts to include the ethernet address and the name by which the host is known to itself.
echo "192.168.0.1  paris" >> /etc/hosts

echo "192.168.0.2  neuchatel" >> /etc/hosts

echo "192.168.0.4  samos" >> /etc/hosts
This way, the client can find the host that has the printer connected to it since it can do address translation from the host name to the right ethernet address. Naturally, CUPS is just one example; this makes it possible for my machine to know all other machines by name, from web browsers to ssh and ftp on the command line.
I also added quite a few nfs shares to /etc/fstab, and on the machines serving those shares I modified /etc/exports accordingly.
Something extra has changed that needs mentioning: the boot is now so fast because of some tweaks that Mandriva developers have done. No problem there, except that the network is not yet up when my system tries to mount the nfs partitions from my server. So I did
echo "mount -a" >> /etc/rc.local
to fix this.
Setting up the IR Remote Control
To get the remote control that came with my tv-card working, I needed LIRC, so I issued the following commands, as root:
urpmi lirc lirc-remotes

cp /usr/share/lirc-remotes/hauppauge/lircd.conf.hauppauge /etc/lircd.conf

cp /usr/share/lirc-remotes/hauppauge/lircmd.conf.hauppauge /etc/lircmd.conf

vi /etc/sysconfig/lircd
(feel free to use any other text editor instead of vi) where I changed the following things:
DRIVER=UNCONFIGURED into: DRIVER=default
and:
HWMOD=UNCONFIGURED I replace with the following 2 things:
HWMOD=lirc_dev

HWMOD=lirc_i2c
Note that the lirc device is now correctly mentioned as /dev/lirc/0 so contrary to Mdv05 no need to change anything.
Finally, to start things I issued these 2 commands:
service lircd start

service lircmd start
For the lircmd there are some extra things necessary in the /etc/X11/xorg.conf file, namely the extra mouse section and the related mouse setting in the server section at the end of the file.
These are the relevant lines:
#added aRTee:

Section "InputDevice"

    Identifier "LircMouse"

    Driver "mouse"

    Option "Device" "/dev/lircm"

    Option "Protocol" "IMPS/2"

    Option "Buttons" "5"

    Option "ZAxisMapping" "4 5"

EndSection
and at the end:
Section "ServerLayout"

    Identifier "layout1"

    InputDevice "Keyboard1" "CoreKeyboard"

    InputDevice "Mouse1" "CorePointer"

# added aRTee

    InputDevice "LircMouse" "SendCoreEvents"

    Screen "screen1"

EndSection
I just continued to use the file (that at the time I created with a lot of trial and error) in my homedir ~/.lircrc that makes lirc and mplayer work together. Make sure you do switch on lirc support of mplayer and xine. And voila. So now I can move the mouse with the remote, fully control mplayer from the sofa, go through menus in xine, like with a normal dvd player. And I have done the setup for Tvtime too, wonderful app!
KDE / graphical user interface configuration steps
Most of the following things are done by the user, in the users home directory (/home/[user]) or with gui tools. Note that I did most of this before, I just continued to use the same /home partition and home dir.
First things first, which for me means to get usable (windows) behaviour. Meaning: not the standard behaviour that the most used OSes have, but something that you (I really) can actually work with. I want/need/require (hey it's my machine, I can require things of it, right?) the following:
- window focus follows mouse (meaning, the window that the mouse pointer is on/in is the one that is active, so when I type it will go into that window)
- clicking in any window with the lmb, mmb or rmb does not bring the window to front (meaning, I can actually select something in a window with the lmb without the window popping to the front)
- move a window without having it on top
- move a window without having to go to the window frame with the mouse pointer
- resize a window without having it on top
- resize a window without having to go to the window frame with the mouse pointer
- bring a window to the front without having to go to the window frame with the mouse pointer
- send a window to the back without having to go to the window frame with the mouse pointer
- single click on icons to launch applications or descend into folders
It must be my lucky day, because all this can easily be done with KDE. Actually, points 3 to 8 are readily available already, without having to change anything in the settings. Note that point 7 is necessary since I wanted that clicking in a window does not bring it to front (which is the case in the standard less usable behaviour). 3 and 4 is done with alt+lmb, 5 and 6 with alt+rmb, 7 and 8 with alt+mmb. To get 1 and 2, start KDE control center: Menu => what to do => administer your system => configure KDE. (Alternatively there are entries for all subsections of the KDE control centre in Menu => Configuration => KDE, but we'll be doing more than just this.)
I have gotten a bit creative and made a shockwave flash page (warning: ~600KB) on what this behaviour looks like.
Now expand the LookNFeel section by clicking on the plus sign in front of it. Go to Window Behavior, and choose the Policy: Focus Follows Mouse; then unselect 'auto raise' and 'click raise'. At the top, go to the second tab 'Actions' and in the 'Inactive Inner Window' make sure all three entries say: 'Activate & Pass Click'.
The lower part should have alt as the modifier key, and lmb+mod key=move, mmb+mod key= toggle raise & lower, rmb+mod key = resize. Don't forget to click apply at the bottom.
Now that we're here, we may as well set the single click part, so that a single click on a desktop icon will do to launch whatever is being clicked. Expand (on the left side) the Peripherals section, select the 'mouse' entry, and select 'Single-click to open files and folders' in the Icons-section. BTW in the 'Advanced'-tab you can adjust the speed of the mouse (among other things) if it's not to your liking.
Now that the KDE CC is open anyway, let's expand the 'LookNFeel' section again, and select 'Behaviour'. If you don't want to have icons on your desk with /mnt/cdrom2 /mnt/cdrom /mnt/floppy written to them, you can deselect the 'Display devices on desktop' checkbox. Hint: if you then right click on your desktop and select Create New => Link to Location (URL) you can just add a name, like: my dvdrom and a location: /mnt/cdrom2 (which is where my dvdrom gets mounted; check that in /etc/fstab). If you choose this setting, you also don't get icons for usb-storage devices (external harddrives, memory cards, photo cameras that comply with the usb-storage protocol).
Something else that I like(d) is Icon Zooming. Well, it seems this was taken out, one used to be able to turn that on as follows: right click the panel and select 'Panel Menu' => 'Configure Panel', in the new window that opens select the 'Appearance' entry on the left side, and tick the box: "Enable icon zooming". This dialog is also in the 'look and feel - panel' section of the KDE Control Center. Now it just says: enable mouseover effects. I like this too, and for icon zooming there are other nice programs, such as ksmoothdock. (Upon some searching, I've found that KDE developer Aaron Seigo found his icon zooming code "KDE trying to be something else", and so he removed it...)
Setting up the extra mousbuttons on my Logitech MX700
To be able to use the extra mouse buttons that I have on my MX700 wireless optical USB mouse I did the following:
urpmi imwheel
as root, and as regular user:
echo "#!/bin/sh" > ~/.kde/Autostart/mx700backforth

echo "killall /usr/bin/imwheel" >> ~/.kde/Autostart/mx700backforth

echo "imwheel -k -b "67"" >> ~/.kde/Autostart/mx700backforth

chmod +x ~/.kde/Autostart/mx700backforth
plus, of course the following (also as normal user, in the home-dir) to make the right .imwheelrc:
With these settings/files the thumb buttons on the mouse are "back" and "forward" in Firefox (somehow in konqueror it doesn't work though it used to - something to look into - now it scrolls horizontally; not bad either since I use mousegestures through khotkeys), and the wheelbuttons function as if the wheel is continuously being scrolled respectively up or down. My
Note also that the 2.6 kernel works in a way that usb and ps/2 mice both work, no extra section is required anymore, except for the LIRC mouse daemon Before starting on the closed source SUN java version, I'd like to point out that there are Free (in the free beer _and_ the FREE speech sense) Java implementations, and they are included in Mandriva 2005 LE.
If those Free java implementations don't suit your needs, you may want to go for the SUN non-free version, after deinstalling with
Alternatively you'll have to get Java directly from SUN.
Just as with Java, there are fully Free (in the free beer _and_ the FREE speech sense) flash players. You just have to do:
After installing the flash player, of course you have to make your webbrowser aware that it exists.
On my laptop I knew suspend to disk a.k.a. hibernate worked fine with Mandrakelinux 10.1. On Mandriva 2005 LE however, suspend to RAM worked properly, for the very first time, but suspend to disk didn't. Switching to the multimedia kernel was what finally brought on double happiness, and this has not changed for Mandriva Linux 2006, so do as root: Well, since I had to return both pcmcia cards from the previous section, I decided to give Bluetooth networking a go... I just got too used to Mandriva 2005 LE so I really didn't want to go back to Mandrakelinux 10.1 just for the wireless USB dongle... To connect a Linux client pc to a Linux server via a Bluetooth PAN (Personal Area Network), one needs a bluetooth interface on each machine, and some daemons and setup files on both machines. I got myself a couple of Bluetooth USB dongles (MSI-6967 Class 1 100m), and plugged them in, whilst watching the system messages (
To have the server and client pick up the ip address automatically, one can create the file
For those who are using a wired internal / home range network connected through the same server, I have come across some caveats. My internal network wasn't reacheable via the wired nic and switch as soon as I connected the BT dongle with an IP in the same range, I could only manage properly once I chose another IP range - in my case, I put both BT dongles in the 192.168.1.x range, whereas my wired network uses the range 192.168.0.x.
Note: this section is roughly a copy-paste from the 05LE config page, but there are two important differences: 1) I had to reboot (well, logging off and back on might have worked, but I just happen to have rebooted) before pairing worked, and 2) the faac coder package cannot any longer create mpeg4 audio streams by itself, one has to do
I'm the proud owner of a Samsung SGH-D500 mobile phone (a mobile that actually carries a bit of my own work inside, but that's off-topic here), which sports a bluetooth interface. To communicate with the phone I installed the KDE bluetooth software by doing (as root):
On a short side note, this phone supports mp3 and aac audio formats, and with 96MB built-in flash memory, it makes a nice music player, but not for so many songs. Now, with aac which offers a higher quality for the same bitrate, or rather a similar quality for a lower bitrate encoding (hence smaller file size) a bit more music can be stored and carried around on the phone. To encode files to aac file format, I installed the codec (as root, this needs the plf repositories):
A negative thing about this phone and bluetooth communications is that it's soo sloooww. I generally get around 27KB/s - and that's with the phone practically on top of the usb dongle, no distance or signal blocking issues at all... even worse than PAN networking.
All in all, using bluetooth is extremely easy in terms of bluetooth itself (also compared to info on a D500 forum related to BT on MSWindows), but special communications with non-standard (or is it not-yet-popular-enough- ...?) devices may still be cumbersome.
If you'll read back what I wrote about Mandriva 2005 lE it seems there's some regression in terms of the pwc webcam driver. I have not had any wireless devices to try out, in case I get my hands on some I'll include the way to get them to work here.
Since I used the Powerpack edition, I didn't have any configuration for Nvidia drivers, flash or java, and installing Opera was as easy as urpmi opera. Those who will use the Free Download edition may have a tad bit more work to do, but there's no magic involved, and you too can have a nicely working Linux machine within about 2 hours - one for installation, one for configuration. Well, provided your hardware isn't of the problematic type.
Enjoy Linux!! ;-)
Rob a.k.a. aRTee
If you have any comments you can discuss this information here: http://mandrivausers.org/index.php?showtopic=28741
or you can contact me via email.
echo '".*"' > ~/.imwheelrc

echo "None, Down, Alt_L|Left" >> ~/.imwheelrc

echo "None, Up, Alt_L|Right" >> ~/.imwheelrc/etc/X11/xorg.conf mouse section contains the following (only the relevant section is shown here; you can also have a look at my whole /etc/X11/xorg.conf):
Section "InputDevice"

    Identifier "Mouse1"

    Driver "mouse"

    Option "Protocol" "ExplorerPS/2"

    Option "Device" "/dev/mouse"

    Option "ZAxisMapping" "6 7"

EndSection
lircmd.
Setting up java in Konqueror, Mozilla and Opera
All you have to do if you want to try is:
urpmi kaffe
urpme kaffe.
The following section is practically a direct copy-paste from the Mandrakelinux 10.1 configuration page... there might be some things I still have to update, such as the current SUN java version... just take the latest recommended one from SUN.
If you're a clubmember and you set up the commercial repository (more info via the MandrakeClub website), you have the easiest path to install java. All you have to do is this:
urpmi j2re
then set up your browsers to use java:
Konqueror: Settings > configure Konqueror > Java & Javascript: enable Java globally.
Mozilla: Edit > Preferences > Advanced, enable JavaSetting up flash in Konqueror, Mozilla and Opera
urpmi gstreamer-swfdec
and give it a try, and if it doesn't suit your needs, uninstall it with urpme gstreamer-swfdec and try:
urpmi gplflash
Naturally, you can get the non-free (as in speech) player from Macromedia (nay, Adobe).
Laptop hibernate and suspend
kernel-multimedia-2.6.12-12.mm.4mdk
to install it. With this, both the suspend to disk and the suspend to RAM functions work.
Bluetooth networking
tail -f /var/log/messages). I saw that the various necessary bluetooth related modules got loaded, so I knew that indeed the dongle was supported (it seems that the Bluetooth stack is so well standardised that most or practically all dongles should be supported under Linux - naturally I had checked for my particular model of BT USB dongle before I bought it).
Supposing the server is connected to the internet, all one has to do is to change the file /etc/sysconfig/pand to contain the following:
PANDARGS='--listen --role NAP'
This modification must be done as root, and the pand service must be started as root as well:
service pand start
(alternatively one can start the server pand by hand by doing: pand --listen --role NAP)
Next, the server Bluetooth interface MAC address is needed, which can be found by doing
hcitool dev
on the server, or:
hcitool scan
on the client machine. After this, the client machine can connect to the server by doing:
pand -c xx:xx:xx:xx:xx:xx
where the x-es must be substituted with the bluetooth dongle MAC address. After (and only after!!) connecting the two machines like this, the network devices bnep0 will show up on both machines (just do /sbin/ifconfig to see them). These can be configured with ifconfig (for instance on the server: ifconfig bnep0 192.168.0.1 up and on the client machine the same with address 192.168.0.2 - at this point, it should be possible to ping the server from the client and vice versa) and route (only on the client machine: route add default gw 192.168.0.1 bnep0).
In this example, the server is set up as a server for internet sharing (if there's another device on the network that serves as gateway, the above route command must be adapted to point to that device/IP address).
/etc/sysconfig/network-scripts/ifcfg-bnep0 with the correct IP addresses, so that as soon as the pand connection is established and the bnep0 network device is present, the device gets the proper IP address. On my laptop (the client machine), that file looks like this:
DEVICE=bnep0

BOOTPROTO=static

IPADDR=192.168.0.97

NETMASK=255.255.255.0

NETWORK=192.168.0.0

BROADCAST=192.168.0.255

ONBOOT=yes

METRIC=10

MII_NOT_SUPPORTED=no

USERCTL=no
Since my server runs shorewall, I had to set it up to masquerade the BT dongle range to the wired network range. Sure, this is most likely not proper, but like I stated before, I'm not a guru, I just make things work and once they do what I need or want them to do, I move on. However, if anyone can tell me how to make the proper setup, I'm all ears.
Anyway, if you have the client pc set up but can't connect (not sure if I had more troubles due to the client machine/laptop also having a wired connection), check with route; I had to use:
route add default gw 192.168.1.91 bnep0
on the laptop, where the bnep0 interface on the server had the IP address: 192.168.1.91.
Bluetooth mobile phone communication
urpmi mpeg4ip...
urpmi kdebluetooth
and started it as regular user with:
kbluetoothd
which gave me a new icon on the kicker panel, without any active connections it looks like this:
![]()
and with activity it looks like this:
![]()
(BTW: another tool that may be of interest is khciconfig.)
I suppose that a logoff-logon or reboot would have given this icon too, but this was the quickest way for me. Contrary to By the way, if you plug in the Bluetooth dongle, you get a message like this:
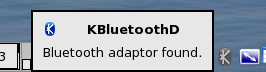
and upon unplugging this pops up:

To see what devices are seen all one has to do is right click the icon and go to 'recently seen devices':
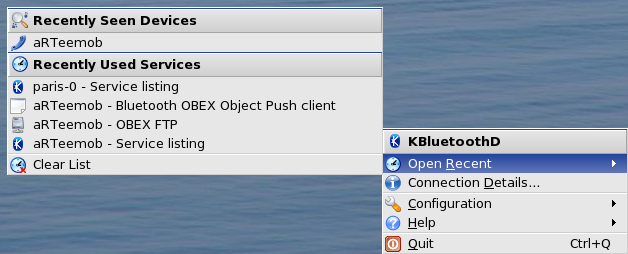
but this only works after your bluetooth devices have been seen; to trigger the detection, you can open konqueror and go to bluetooth:/ (just put that in the address bar, or if you're viewing these pages with konqueror, click that link - and pay attention: there's only a single / instead of the regular // as in http:// or ftp:// ...)

After turning on my mobile phone bluetooth interface, I could easily pair the two devices, as mentioned before only after rebooting (though logging off and on may suffice) - just select on the phone to connect to the laptop, or on the laptop in the konqueror window: click the phone icon then you have to input the same pin code on both devices, first on the phone, then on the pc:
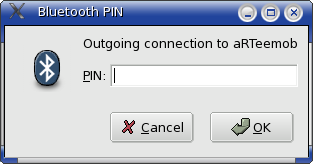
after which the connection is made
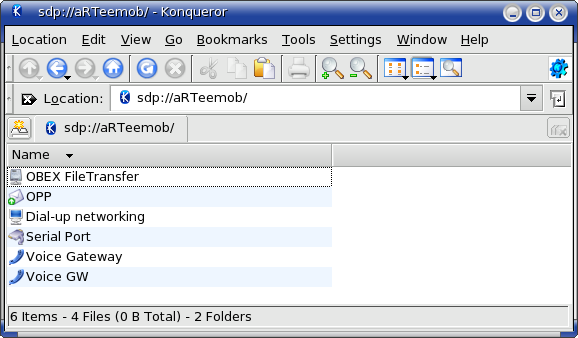
and ready to exchange data - the OBEX ftp server was the easiest way to copy things to and from the phone:
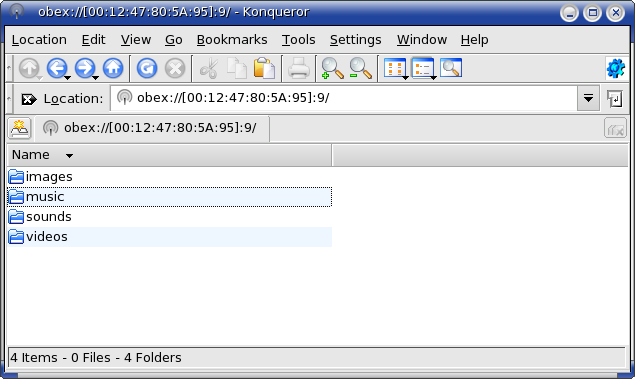
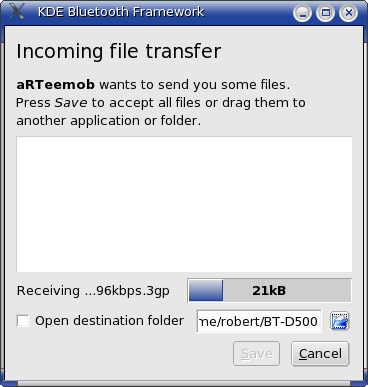
but sending things from the phone to the laptop was also straightforward - a popup shows up to ask whether to accept the file and after receiving it one can indicate where it should be stored:
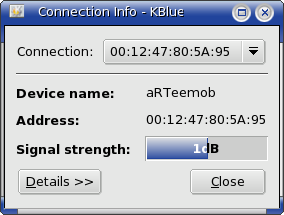
and during the communication it is possible to check the signal strength of the connection by right clicking the kbluetooth icon and selecting 'Connection details':
Note that I can exchange photos/images, videos and melodies, but I haven't managed with the D500 to synchronise (address book, calendar, etc). Naturally, Samsung doesn't provide any Linux software, but the phone is advertised as syncml compliant... and I've tried kmobiletools, multisync/multisynk with syncml and then some.... so if you know more on sync-ing the D500 with a Linux machine, please drop me a line. Oh, and I've also not been able to install java games onto the phone from the Linux laptop - for MSWindows there are workarounds to achieve this, albeit not in a straightforward way.
urpmi faac mpeg4ip
(accept the dependencies, they're needed) and then encoded some .wav files on my system to aac with the command:
faac -b 128 [filename].wav --mpeg-vers 4 -o [filename].mp4.aac
It is necessary for this phone that the audio data is wrapped in a proper ISO MP4 container, so one has to do:
mp4creator -create [filename].mp4.aac [filename].aac
Also note that the file extension is .aac (not .mp4 or .mpa which are normally also accepted for this file type). Feel free to use other bitrates and options than I do. Note that there is no manual page for faac, but
faac -h
will tell you what other options exist and how to use those. If you have a whole directory with .wav files that you would like to convert to aac files you can do:
for i in *.wav ; do faac -b 128 "$i" --mpeg-vers 4 -o "$i.aac"; done
If you happen to have lots of ogg vorbis files (as I do), you can convert them to .wav files with the command ogg123 before you use the previous command (naturally, it's better to buy devices that are capable of playing ogg files). On a side note, you could also reconvert mp3 files to aac (use mp123), but unless you are going from a fairly high mp3 bitrate to a lower aac bitrate (say, from 196kb/s to 128kb/s or lower) you might as well just use the mp3 files.
Conclusion
Feedback

All contents © copyright 2003 - 2007, unless mentioned otherwise, published under the GNU Free Documentation License (FDL) by aRTee. Artwork and CSS don't fall under the FDL, standard copyright applies. Tux image from Larry Ewing. You may use anything published under the FDL on this site freely, as long as you include this copyright notice and a reference to the main address of this site: www.mandrake.tips.4.free.fr.


